


- High-density polymer build
- 6.02mm Tightbore inner barrel
- In-line MOSFET pre-installed
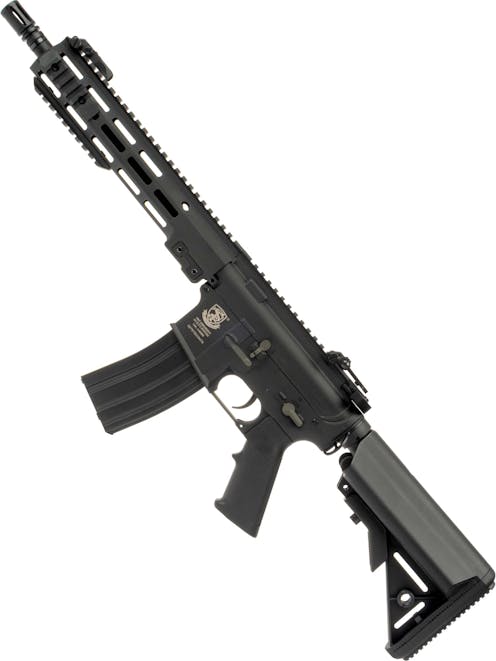
Whether you're a new skirmisher seeking a modern primary or an experienced Airsofter seeking a lightweight and reliable backup, the S&T M4/AR-15 SOPMOD Block 3 11.5" AEG; ETU Version is one to watch. This M4/AR-15 AEG platform is made predominantly from high-density polymer with an alloy outer barrel and a mix of alloy and steel trim parts, making it light and strong, ideal for fast-moving skirmishers and those who prefer to fight easy.
On the inside, the S&T Block 3 build features an alloy version 2 gearbox with a modern Rotary HOP-up unit, setting it up to be competitive and upgrade-compatible without overcomplicating things by reinventing the wheel. The inner barrel is also a 6.02mm tightbore example, promising above-average accuracy potential when used with high-quality BBs. This updated version now also features an in-line MOSFET and low-resistance wiring, giving it improved electrical efficiency and a super snappy trigger response in semi-auto.
Equipped with a 20mm Picatinny railed receiver, M-LOK handguard and threaded outer barrel, the S&T Block 3 is ready to be dressed up SF style with tactical flashlights, lasers and suppressors. If you're into the latest real steel builds used by US special forces, you'll love the M4/AR-15 SOPMOD Block 3 11.5" AEG; ETU Version from S&T. It's a liberating experience throwing your rifle around like a real special forces operator without lifting a single dumbbell!
Fast Delivery
Delivery & Postage
Here at Patrol Base, we send all our packages from our Warehouse based in the UK with the exception of European Warehouse Items. All of our parcels are sent with specially picked couriers to ensure your parcels get to you on time and in one piece.
For more information please check out our Delivery Information Page.
Estimates
Below are some rough postage prices for orders. Please note these are subject to change and are only a rough guide. For a more accurate postage estimate please use the Postage Calculator at the basket.
UK 3-5 day Standard
£6.95
From
1-2 Working Day Dispatch UK mainland
£9.95
From
Highlands / Islands
£24.99*
From
* Please note that Scottish Highlands, and Islands postage prices can vary wildly. Please refer to the Postage Calculator at the basket for the lowest possible price.
Returns
We want you to be absolutely happy with our products and services, so we provide the simple Patrol Base guarantee: if on receiving your item you are unhappy with your item for any reason then simply send it back to us. We will replace or refund the item.
You can return any item for any reason whatsoever, even if you have just changed your mind, within 14 days of receipt of the order. This is in addition to your rights under the Consumer Protection (Distance Selling) Regulations 2000.
For more information on returning products, and how to do it please visit our Returns Policy Page.
Description
If you're a fan of the latest real steel designs and need a light, agile build to keep your energy high in-game, the S&T M4/AR-15 SOPMOD Block 3 11.5" AEG; ETU Version has your name on it! Based on the real steel MK16 URG-I build, the SOPMOD Block 3 makes a fantastic primary for special forces-inspired loadouts and is equipped with both 20mm Picatinny rails and M-LOK negative space attachment slots, making it ready to rock with almost any accessory you need to complete your mission.
Inside, the M4/AR-15 SOPMOD Block 3 is generously equipped, boasting a 6.02mm tightbore inner barrel paired with a rotary HOP-up for solid long-range performance, fully upgradeable with TM spec internal parts for those who want more. This, the latest version, is also equipped with an in-line MOSFET and low resistance wiring, preventing lockups in semi-automatic mode and providing a snappy trigger ideal for CQB scenarios. Whether you're working on a US Special Forces loadout or you're a beginner looking for a reliable, upgradeable and accessory-ready primary, the S&T M4/AR-15 SOPMOD Block 3 11.5" AEG; ETU Version has your back!
Starting at the front, we find a pre-installed bird cage-style flash hider. This is very much the industry standard when it comes to muzzle devices, being present on most Airsoft M4/AR-15 platforms straight out of the box. The muzzle device can be removed by twisting it clockwise, revealing the 14mm CCW threading underneath. This is the most common threading and will accept a plethora of aftermarket tracer units and suppressors, ideal for customisation fans!
The handguard of the SOPMOD Block 3 is a perfect match for the real steel SMR rail used on the special forces URG-I equipped rifles, offering a 20mm Picatinny rail at the 12 o'clock position as well as M-LOK slots at 3, 6, and 9 o'clock. The offset slots are non-functional but still add to the Block 3 aesthetic. The upper rail mates seamlessly with the receiver rail, allowing for optical sight setups of any length to be mounted, including red dot sight and magnifier combinations. The use of M-LOK negative space attachment slots makes the front end super light and agile, and despite its length, the SOPMOD Block 3 can be swiftly manipulated easily, ideal for modern shooting doctrine.
Close to the receiver, the handguard has what appears to be QD sling sockets on either side. In our tests, we found these sockets to be non-functional, at least with the QD swivels we had handy. If you plan to use a QD two-point sling setup with the Block 3, we recommend adding a rail-mounted QD socket to the top rail. Also pre-installed on either side of the handguard are 20mm Picatinny rail adapters for M-LOK, allowing you to run 20mm accessories on the sides, reposition the rails to any of the other M-LOK slots or remove them entirely for a sleeker look.
As we come to the receiver of the SOPMOD Block 3, we can take note of its familiar M4/AR-15 style layout, making it an easy transition in terms of training if you're already accustomed to running an AR platform in-game. The charging handle, located at the top rear of the receiver, is a fantastic replica of the real steel "airborne charging handle", an ambidextrous, low-profile handle which matches the real Block 3 build to a tee. Pulling the charging handle back will pop open the dust cover, retract the mock bolt carrier and lock it to the rear, ready for HOP-up adjustment.
The rotary HOP-up design is known for allowing finer increments of adjustment for more precise HOP-up application, and holding its setting for longer under the vibrations of full-auto fire. This HOP-up unit is paired with a 6.02mm tightbore inner barrel, giving the Block 3 spot-on accuracy right out of the box, with little left to improve. Once you've completed your adjustment, you can hit the "ping pong paddle" style bolt release catch on the centre left of the receiver to close the mock bolt with a satisfying "clank".
The fire selector is of the standard M4/AR-15 layout, with a 3-position selector switch located above the pistol grip on the left side, offering safe, semi-auto and full auto. The selector has a 90-degree throw between each fire mode, allowing the control to be used swiftly while minimising the chances of accidentally knocking the selector out of place. This is one of the most beloved features of AR-15 platforms; it's easy to master, feels great to manipulate and is common to almost every AR, making it easy to switch things up.
The S&T SOPMOD Block 3 features a curved "milspec" style trigger, just like the real thing, keeping the build visually accurate to please realism fans. The pistol grip is the prolific M4A1/M16A2 grip, known as the "A2" finger-ridged grip. This suits the military style build perfectly and is comfortable for a wide variety of hand sizes, but as with most M4/AR-15 AEGs, this grip is compatible with aftermarket M4/AR-15 AEG grips, ideal for customisation addicts!
The magazine release is located on the magazine well on the right side and is well within reach of the trigger finger for right-handed users. This mag catch is right-hand optimised but can be used by lefties as well with a bit of practice. The right side of the upper receiver has the usual M4/AR-15 features, including a mock forward assist button, mock brass deflector and the dust cover which conceals the mock bolt and HOP-up adjuster.
At the rear of the receiver, we are treated to an ambidextrous sling plate which offers two sling points on the left side and one on the right. The sling plate is ideal for single-point slings, but can also be paired with a front sling mount if you prefer a two-point sling setup. Being constructed from steel allows the sling plate to take the weight of the Block 3 easily, and provides confidence that the plate will never fail and dump your gorgeous rifle into the dirt.
Following the sling plate, we come to the 6-position M4/AR-15 buffer tube, offering 6 length of pull positions so you can adjust to suit your body type and loadout. To adjust the crane stock, simply press the adjustment lever on the bottom and slide it into your position of choice. This allows body armour users to adjust for a comfortable stance and suits shooters of all body types. If you ever feel like changing up the looks of your Block 3, you'll be happy to learn the buffer tube accepts almost all M4/AR-15 AEG sliding stocks!
The battery compartment is inside the crane stock, accessible by squeezing the two tabs at the toe of the stock together, after which you can lift the butt plate off, remove the battery plug and make use of the stock's built-in battery compartment to house a nunchuck/crane-style battery. For the S&T M4/AR-15 SOPMOD Block 3, we recommend a 7.4V 1450mAh LiPo crane/nunchuck battery for an easy fit and great performance.
The Crane stock also includes a pair of QD sling sockets, one on each side, allowing for QD sling swivels to be added for a quick, removable sling setup. Conventional sling slots (aka "footman loops") are also present for those who want a two-point sling but prefer the old-fashioned way. The butt plate is also made from grippy rubber, ensuring your SOPMOD Block 3 doesn't slip off your shoulder at a critical moment.
On the inside, this Block 3 build is based on Tokyo Marui's proven M4 AEG design, with an alloy version 2 gearbox with steel 18:1 ratio gears running on 8mm bushings and full compatibility with aftermarket upgrades. A quick-change spring system makes power tuning a breeze, and inside this latest version, we're treated to low-resistance wiring and an in-line MOSFET, improving trigger response significantly and guaranteeing that you never get a lock-up when shooting semi-auto at pace.
A 6.02mm tightbore inner barrel paired with a modern, rotary HOP-up unit gives the Block 3 solid performance at long range and great accuracy potential with high-quality ammo. The use of a rotary HOP-up unit should provide ample range, but if you want more, the HOP-up and inner barrel are also compatible with upgrade parts. We cannot deny it, we get a kick out of imagining this full polymer AEG with an HPA engine or other internal wizardry inside, and if you share our fantasy, you can make it happen!
A solid build from front to back with respectable pre-upgraded internals rarely seen in platforms at this price, the S&T M4/AR-15 SOPMOD Block 3 11.5" AEG; ETU Version is a great option for new skirmishers and veterans seeking a lightweight backup to their full metal primaries. If you want to look the part in-game but don't want to work as hard as a real special forces operator, this Block 3 build is the way to go!
Features
- High density polymer build - Alloy outer barrel, alloy & steel trim parts
- 6.02mm Tightbore inner barrel - Great accuracy potential
- 14mm CCW Male threaded outer barrel - Tracer/suppressor ready
- Flip-up iron sights pre-installed - Stow and deploy by hand, fully adjustable
- SMR style M-LOK handguard - 20mm Picatinny rail at 12 o'clock, M-LOK slots at 3, 6, & 9
- 20mm Picatinny railed receiver - Ready for a red dot sight or rifle scope
- Rotary adjustable HOP-up unit - Easy to adjust in fine increments, holds its setting well long term
- "A2" Finger ridged pistol grip - The standard M4A1/M16A2 grip, grippy and comfortable for most hand sizes
- Enlarged trigger guard - Built into the receiver, very strong and plenty of room for gloved use
- 3-Position fire selector switch - SAFE, SEMI AUTO & FULL AUTO, 90-degree throw between each mode
- Ambidextrous CQD-style sling plate - Ideal for single-point slings, great for lefties
- 6-Position M4/AR-15 buffer tube - Adjust the stock quickly and easily to suit your body type or loadout
- Crane Battery Stock pre-installed - Comfortable cheek rest, QD sling sockets and sling slots built-in
- Rear wired: Deans connector - Recommended battery:7.4V 1450mAh LiPo battery in Crane/nunchuck config.
- Version 2 Gearbox:
- Alloy shell
- 8mm bushings
- Quick change spring system
- Steel 18:1 ratio gearset
- In-line MOSFET
- Low resistance wiring
- Compatible with M4/AR-15 AEG magazines - Spares are cheap and plentiful!
Package Includes
- S&T M4/AR-15 SOPMOD Block 3 11.5" AEG; ETU Version
- 120rnd Medium-capacity magazine
Specification
General
| Assault Rifle | |
| Yes | |
| Yes, No, | |
| Yes | |
| Magazine | |
| Beginner Player | |
| Li-Po Li-Po - Never Leave Charging Unattended Li-Po - Only Use Approved Chargers Li-Po - Charge in a Fire Safe Area |
Testing
| Approx.345fps ± 10%, using 0.20g BBs |
Weight and Dimension
| Approx.2.1KG | |
| 73.5cm | |
| 81.5cm |
Construction
| Black | |
| Alloy outer barrel & controls. High density polymer handguard, receiver, buffer tube, stock & pistol grip. Steel sling plate, QD sling sockets & trim parts. Rubber butt plate |
Weapon Specific
| Electric | |
| None | |
 | Assault Rifle, M4 / AR-15 / M16, M4/AR-15 AEG, |
   | |
| Trigger Lock | |
| Right Handed | |
| Standard | |
| 1:1 | |
 | 0.25g |
Hop-Up
| Rotary | |
| Inside the ejection port, accessible with the charging handle pulled and the mock bolt locked back. |
Furniture
| |
| 20mm RIS / RAS, Pre-installed 20mm Picatinny rail sections for M-LOK, 20mm Railed Receiver, M-LOK, | |
| Sliding, M4 Crane Stock, Multi-Position, | |
| 6 | |
| Iron Sights, Aperture Iron Sight, | |
| Buffer Plate, Stock, QD, Loop, |
Barrel
Outer Barrel Length (in) | 11.5'' |
|---|---|
| Male | |
| CCW (Counter Clockwise) | |
| 14mm | |
 | 6.02mm |
 | 280mm |
Magazine Specific
 | AEG, Medium Capacity, |
|---|---|
 | Approx.120Rounds |
Electric Gun Specific Information
Gearbox
| V2Gearbox | |
| Rear Wired | |
| Yes | |
| Yes |
Motor
| Standard |
Battery Specific
 | 7.4V |
|---|---|
 | |
Size guide
Joule Charts
Special Instructions
These table can be used as a reference to see if the BB weight you are using will be over acceptable Joulage limits at some Airsoft Sites in the UK. To check if the weight can be used chrono your weapon using the BB you intend to use, and then compare it to the chart.
FPS, Power and Joule Limits can vary from site to site, so please get in touch with where you're going to play with in advance to avoid disappointment.
Suggested limits are based on Joulage Limit rules used Halo Mill: Proving Grounds, with a 350fps limit for Automatic Replicas, 400fps for Semi-Automatic Replicas, and 500fps for Bolt Action Replicas.
Tap the tabs below to open the relevant chart for your replica.
This table should be used for reference, and cannot be used to check one weight against another, as the weight of the BB affects the power.
In order to check if the BB can be used with your replica chronograph using the weight you wish to use and then compare it against the table.
Every time you change weights you will need to re-chrono and check against the table. This is not a conversion chart between weights.
Suggested limits are based on Joulage Limit rules used Halo Mill: Proving Grounds, and is the equivalent of 350fps, using 0.20g BB resulting in an upper limit of 1.14j.
| Velocity | BB Weight (Grams) | |||||||||
|---|---|---|---|---|---|---|---|---|---|---|
| FPS | 0.20 | 0.25 | 0.28 | 0.30 | 0.32 | 0.36 | 0.40 | 0.43 | 0.45 | 0.50 |
| 250 | 0.58 | 0.73 | 0.81 | 0.87 | 0.93 | 1.05 | 1.16 | 1.25 | 1.31 | 1.45 |
| 260 | 0.63 | 0.79 | 0.88 | 0.94 | 1.00 | 1.13 | 1.26 | 1.35 | 1.41 | 1.57 |
| 270 | 0.68 | 0.85 | 0.95 | 1.02 | 1.08 | 1.22 | 1.35 | 1.46 | 1.52 | 1.69 |
| 280 | 0.73 | 0.91 | 1.02 | 1.09 | 1.17 | 1.31 | 1.46 | 1.57 | 1.64 | 1.82 |
| 290 | 0.78 | 0.98 | 1.09 | 1.17 | 1.25 | 1.41 | 1.56 | 1.68 | 1.76 | 1.95 |
| 300 | 0.84 | 1.05 | 1.17 | 1.25 | 1.34 | 1.51 | 1.67 | 1.80 | 1.88 | 2.09 |
| 310 | 0.89 | 1.12 | 1.25 | 1.34 | 1.43 | 1.61 | 1.79 | 1.92 | 2.01 | 2.23 |
| 320 | 0.95 | 1.19 | 1.33 | 1.43 | 1.52 | 1.71 | 1.90 | 2.05 | 2.14 | 2.38 |
| 325 | 0.98 | 1.23 | 1.37 | 1.47 | 1.57 | 1.77 | 1.96 | 2.11 | 2.21 | 2.45 |
| 328 | 1.00 | 1.25 | 1.40 | 1.50 | 1.60 | 1.80 | 2.00 | 2.15 | 2.25 | 2.50 |
| 330 | 1.01 | 1.26 | 1.42 | 1.52 | 1.62 | 1.82 | 2.02 | 2.18 | 2.28 | 2.53 |
| 335 | 1.04 | 1.30 | 1.46 | 1.56 | 1.67 | 1.88 | 2.09 | 2.24 | 2.35 | 2.61 |
| 340 | 1.07 | 1.34 | 1.50 | 1.61 | 1.72 | 1.93 | 2.15 | 2.31 | 2.42 | 2.68 |
| 345 | 1.11 | 1.38 | 1.55 | 1.66 | 1.77 | 1.99 | 2.21 | 2.38 | 2.49 | 2.76 |
| 350 | 1.14 | 1.42 | 1.59 | 1.71 | 1.82 | 2.05 | 2.28 | 2.45 | 2.56 | 2.85 |
| 355 | 1.17 | 1.46 | 1.64 | 1.76 | 1.87 | 2.11 | 2.34 | 2.52 | 2.63 | 2.93 |
| 360 | 1.20 | 1.51 | 1.69 | 1.81 | 1.93 | 2.17 | 2.41 | 2.59 | 2.71 | 3.01 |
Suggested limits are based on Joulage Limit rules used at Halo Mill: Proving Grounds, and is the equivalent of 400fps, using 0.20g BB resulting in an upper limit of 1.49j.
| Velocity | BB Weight (Grams) | |||||||||
|---|---|---|---|---|---|---|---|---|---|---|
| FPS | 0.20 | 0.25 | 0.28 | 0.30 | 0.32 | 0.36 | 0.40 | 0.43 | 0.45 | 0.50 |
| 250 | 0.58 | 0.73 | 0.81 | 0.87 | 0.93 | 1.05 | 1.16 | 1.25 | 1.31 | 1.45 |
| 260 | 0.63 | 0.79 | 0.88 | 0.94 | 1.00 | 1.13 | 1.26 | 1.35 | 1.41 | 1.57 |
| 270 | 0.68 | 0.85 | 0.95 | 1.02 | 1.08 | 1.22 | 1.35 | 1.46 | 1.52 | 1.69 |
| 280 | 0.73 | 0.91 | 1.02 | 1.09 | 1.17 | 1.31 | 1.46 | 1.57 | 1.64 | 1.82 |
| 290 | 0.78 | 0.98 | 1.09 | 1.17 | 1.25 | 1.41 | 1.56 | 1.68 | 1.76 | 1.95 |
| 300 | 0.84 | 1.05 | 1.17 | 1.25 | 1.34 | 1.51 | 1.67 | 1.80 | 1.88 | 2.09 |
| 310 | 0.89 | 1.12 | 1.25 | 1.34 | 1.43 | 1.61 | 1.79 | 1.92 | 2.01 | 2.23 |
| 320 | 0.95 | 1.19 | 1.33 | 1.43 | 1.52 | 1.71 | 1.90 | 2.05 | 2.14 | 2.38 |
| 330 | 1.01 | 1.26 | 1.42 | 1.52 | 1.62 | 1.82 | 2.02 | 2.18 | 2.28 | 2.53 |
| 340 | 1.07 | 1.34 | 1.50 | 1.61 | 1.72 | 1.93 | 2.15 | 2.31 | 2.42 | 2.68 |
| 350 | 1.14 | 1.42 | 1.59 | 1.71 | 1.82 | 2.05 | 2.28 | 2.45 | 2.56 | 2.85 |
| 360 | 1.20 | 1.51 | 1.69 | 1.81 | 1.93 | 2.17 | 2.41 | 2.59 | 2.71 | 3.01 |
| 370 | 1.27 | 1.59 | 1.78 | 1.91 | 2.03 | 2.29 | 2.54 | 2.73 | 2.86 | 3.18 |
| 380 | 1.34 | 1.68 | 1.88 | 2.01 | 2.15 | 2.41 | 2.68 | 2.88 | 3.02 | 3.35 |
| 390 | 1.41 | 1.77 | 1.98 | 2.12 | 2.26 | 2.54 | 2.83 | 3.04 | 3.18 | 3.53 |
| 400 | 1.49 | 1.86 | 2.08 | 2.23 | 2.38 | 2.68 | 2.97 | 3.20 | 3.34 | 3.72 |
| 410 | 1.56 | 1.95 | 2.19 | 2.34 | 2.50 | 2.81 | 3.12 | 3.36 | 3.51 | 3.90 |
Suggested limits are based on Joulage Limit rules used at Halo Mill: Proving Grounds, and is the equivalent of 500fps, using 0.20g BB resulting in an upper limit of 2.32j.
| Velocity | BB Weight (Grams) | |||||||||
|---|---|---|---|---|---|---|---|---|---|---|
| FPS | 0.20 | 0.25 | 0.28 | 0.30 | 0.32 | 0.36 | 0.40 | 0.43 | 0.45 | 0.50 |
| 250 | 0.58 | 0.73 | 0.81 | 0.87 | 0.93 | 1.05 | 1.16 | 1.25 | 1.31 | 1.45 |
| 260 | 0.63 | 0.79 | 0.88 | 0.94 | 1.00 | 1.13 | 1.26 | 1.35 | 1.41 | 1.57 |
| 270 | 0.68 | 0.85 | 0.95 | 1.02 | 1.08 | 1.22 | 1.35 | 1.46 | 1.52 | 1.69 |
| 280 | 0.73 | 0.91 | 1.02 | 1.09 | 1.17 | 1.31 | 1.46 | 1.57 | 1.64 | 1.82 |
| 290 | 0.78 | 0.98 | 1.09 | 1.17 | 1.25 | 1.41 | 1.56 | 1.68 | 1.76 | 1.95 |
| 300 | 0.84 | 1.05 | 1.17 | 1.25 | 1.34 | 1.51 | 1.67 | 1.80 | 1.88 | 2.09 |
| 310 | 0.89 | 1.12 | 1.25 | 1.34 | 1.43 | 1.61 | 1.79 | 1.92 | 2.01 | 2.23 |
| 320 | 0.95 | 1.19 | 1.33 | 1.43 | 1.52 | 1.71 | 1.90 | 2.05 | 2.14 | 2.38 |
| 330 | 1.01 | 1.26 | 1.42 | 1.52 | 1.62 | 1.82 | 2.02 | 2.18 | 2.28 | 2.53 |
| 340 | 1.07 | 1.34 | 1.50 | 1.61 | 1.72 | 1.93 | 2.15 | 2.31 | 2.42 | 2.68 |
| 350 | 1.14 | 1.42 | 1.59 | 1.71 | 1.82 | 2.05 | 2.28 | 2.45 | 2.56 | 2.85 |
| 360 | 1.20 | 1.51 | 1.69 | 1.81 | 1.93 | 2.17 | 2.41 | 2.59 | 2.71 | 3.01 |
| 370 | 1.27 | 1.59 | 1.78 | 1.91 | 2.03 | 2.29 | 2.54 | 2.73 | 2.86 | 3.18 |
| 380 | 1.34 | 1.68 | 1.88 | 2.01 | 2.15 | 2.41 | 2.68 | 2.88 | 3.02 | 3.35 |
| 390 | 1.41 | 1.77 | 1.98 | 2.12 | 2.26 | 2.54 | 2.83 | 3.04 | 3.18 | 3.53 |
| 400 | 1.49 | 1.86 | 2.08 | 2.23 | 2.38 | 2.68 | 2.97 | 3.20 | 3.34 | 3.72 |
| 410 | 1.56 | 1.95 | 2.19 | 2.34 | 2.50 | 2.81 | 3.12 | 3.36 | 3.51 | 3.90 |
| 420 | 1.64 | 2.05 | 2.29 | 2.46 | 2.62 | 2.95 | 3.28 | 3.52 | 3.69 | 4.10 |
| 430 | 1.72 | 2.15 | 2.40 | 2.58 | 2.75 | 3.09 | 3.44 | 3.69 | 3.86 | 4.29 |
| 440 | 1.80 | 2.25 | 2.52 | 2.70 | 2.88 | 3.24 | 3.60 | 3.87 | 4.05 | 4.50 |
| 450 | 1.88 | 2.35 | 2.63 | 2.82 | 3.01 | 3.39 | 3.76 | 4.04 | 4.23 | 4.70 |
| 460 | 1.97 | 2.46 | 2.75 | 2.95 | 3.15 | 3.54 | 3.93 | 4.23 | 4.42 | 4.91 |
| 470 | 2.05 | 2.57 | 2.87 | 3.08 | 3.28 | 3.69 | 4.10 | 4.41 | 4.62 | 5.13 |
| 480 | 2.14 | 2.68 | 3.00 | 3.21 | 3.42 | 3.85 | 4.28 | 4.60 | 4.82 | 5.35 |
| 490 | 2.23 | 2.79 | 3.12 | 3.35 | 3.57 | 4.02 | 4.46 | 4.80 | 5.02 | 5.58 |
| 500 | 2.32 | 2.90 | 3.25 | 3.48 | 3.72 | 4.18 | 4.65 | 4.99 | 5.23 | 5.81 |
| 510 | 2.42 | 3.02 | 3.38 | 3.62 | 3.87 | 4.35 | 4.83 | 5.20 | 5.44 | 6.04 |