
Airsoft Loadout Blog: ODST2B9's US Navy SEAL loadout
Airsoft Loadout: ODST2B9's US Navy Seal Loadout - Outdoors skirmish setup
ODST2B9 is a prominent member of our player community on Toky Woky, and if you have ever made use of the "Ask players a question" button you have probably been given some solid and well thought out advice from ODST2B9. ODST2B9 has been active on Toky Woky for many years, and has attained the rank of "Master Coach" for his efforts.
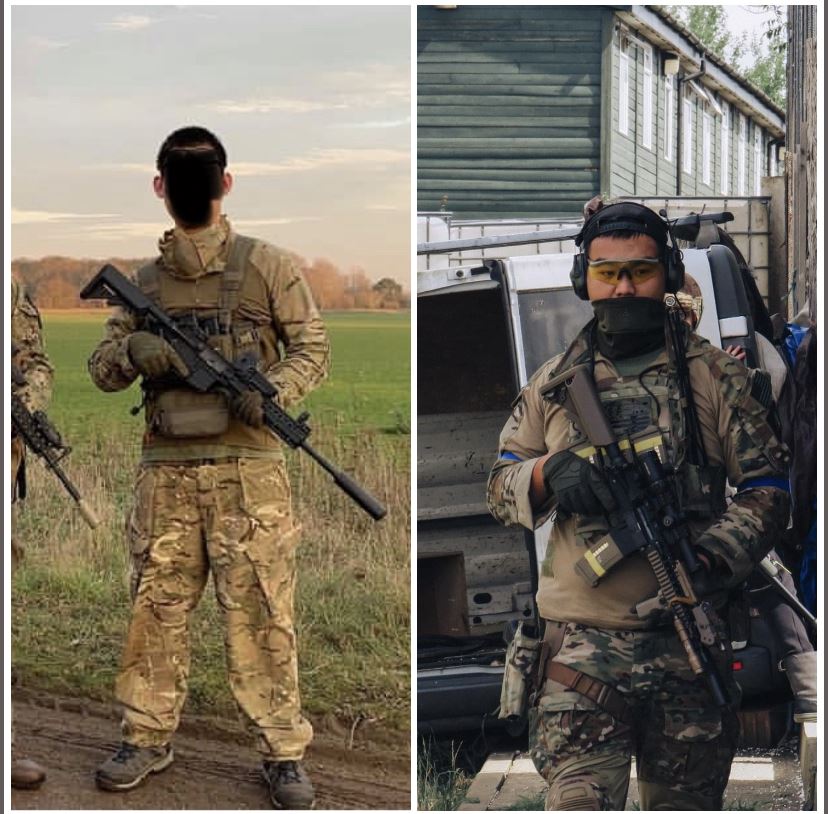
In the above photo we can see the evolution of ODST2B9's loadout, with its beginnings on the left, and its current state on the right. Though the majority of his first loadout has been sold on, ODST started with a real taste for the real kit, and while rocking the G&G R8L, a solid beginner AEG he was also using a Spiritus Systems Lightfigher Chest Rig which is a popular real steel rig design which costs more than the average Airsofter's entire kit. Unconventional beginnings, for sure! When asked about his old Spiritus rig, ODST2B9 said:
"I guess I was peer pressured by my friend to get a chest rig, which was not a poor choice since it was slick, lightweight and was able to carry everything I needed at the time. Looking back at this loadout from the present, I do wish I kept hold of the Spiritus instead of selling it as shortly afterwards I bought a plate carrier which allowed me to carry more pouches for equipment, additionally, it provided protection to my back due to a rear plate bag. I guess back then I had not really thought about airsoft in the future, and wanted to make some money back since I have bought a TMC JPC 1.0, and the Spiritus was not receiving the amount of attention it deserved. If only I could have seen into the future of getting into DEVGRU kits, and Milsim."
When asked about his current loadout, and why he chose to do a Navy SEAL impression, ODST2B9 told us:
"After getting involved with Milsim and real steel kit, I’ve been researching a Special Forces Unit to base my loadout on. It has been brought to my attention from Facebook posts, Instagram stories etc that in the UK the most popular SF loadout would be none other but UKSF/SAS.
If you go to any Milsim in the UK, you will find that the vast majority of loadouts used by players will have been inspired by the UKSF. However, I do like the concept but I wanted to look more unique and stand out from the crowd. So, the next SF unit that uses similar equipment and kit would be the United States Naval Special Warfare Development Group. The equipment will be easy to obtain in the UK, so building the appearance isn’t an issue, and I can have slight differences in the setup to move away from looking like UKSF.
The DEVGRU loadout I use also helps to inspire other players in the UK in creating their own SEAL Team loadouts, stepping away from the UKSF. I have had players during skirmishes approach me and ask about how to build their own SEAL loadout since there aren’t a whole lot of tutorials out there."
The Primary Weapon - Tokyo Marui MK18 MOD.1 Next Gen Recoil Shock AEG Rifle
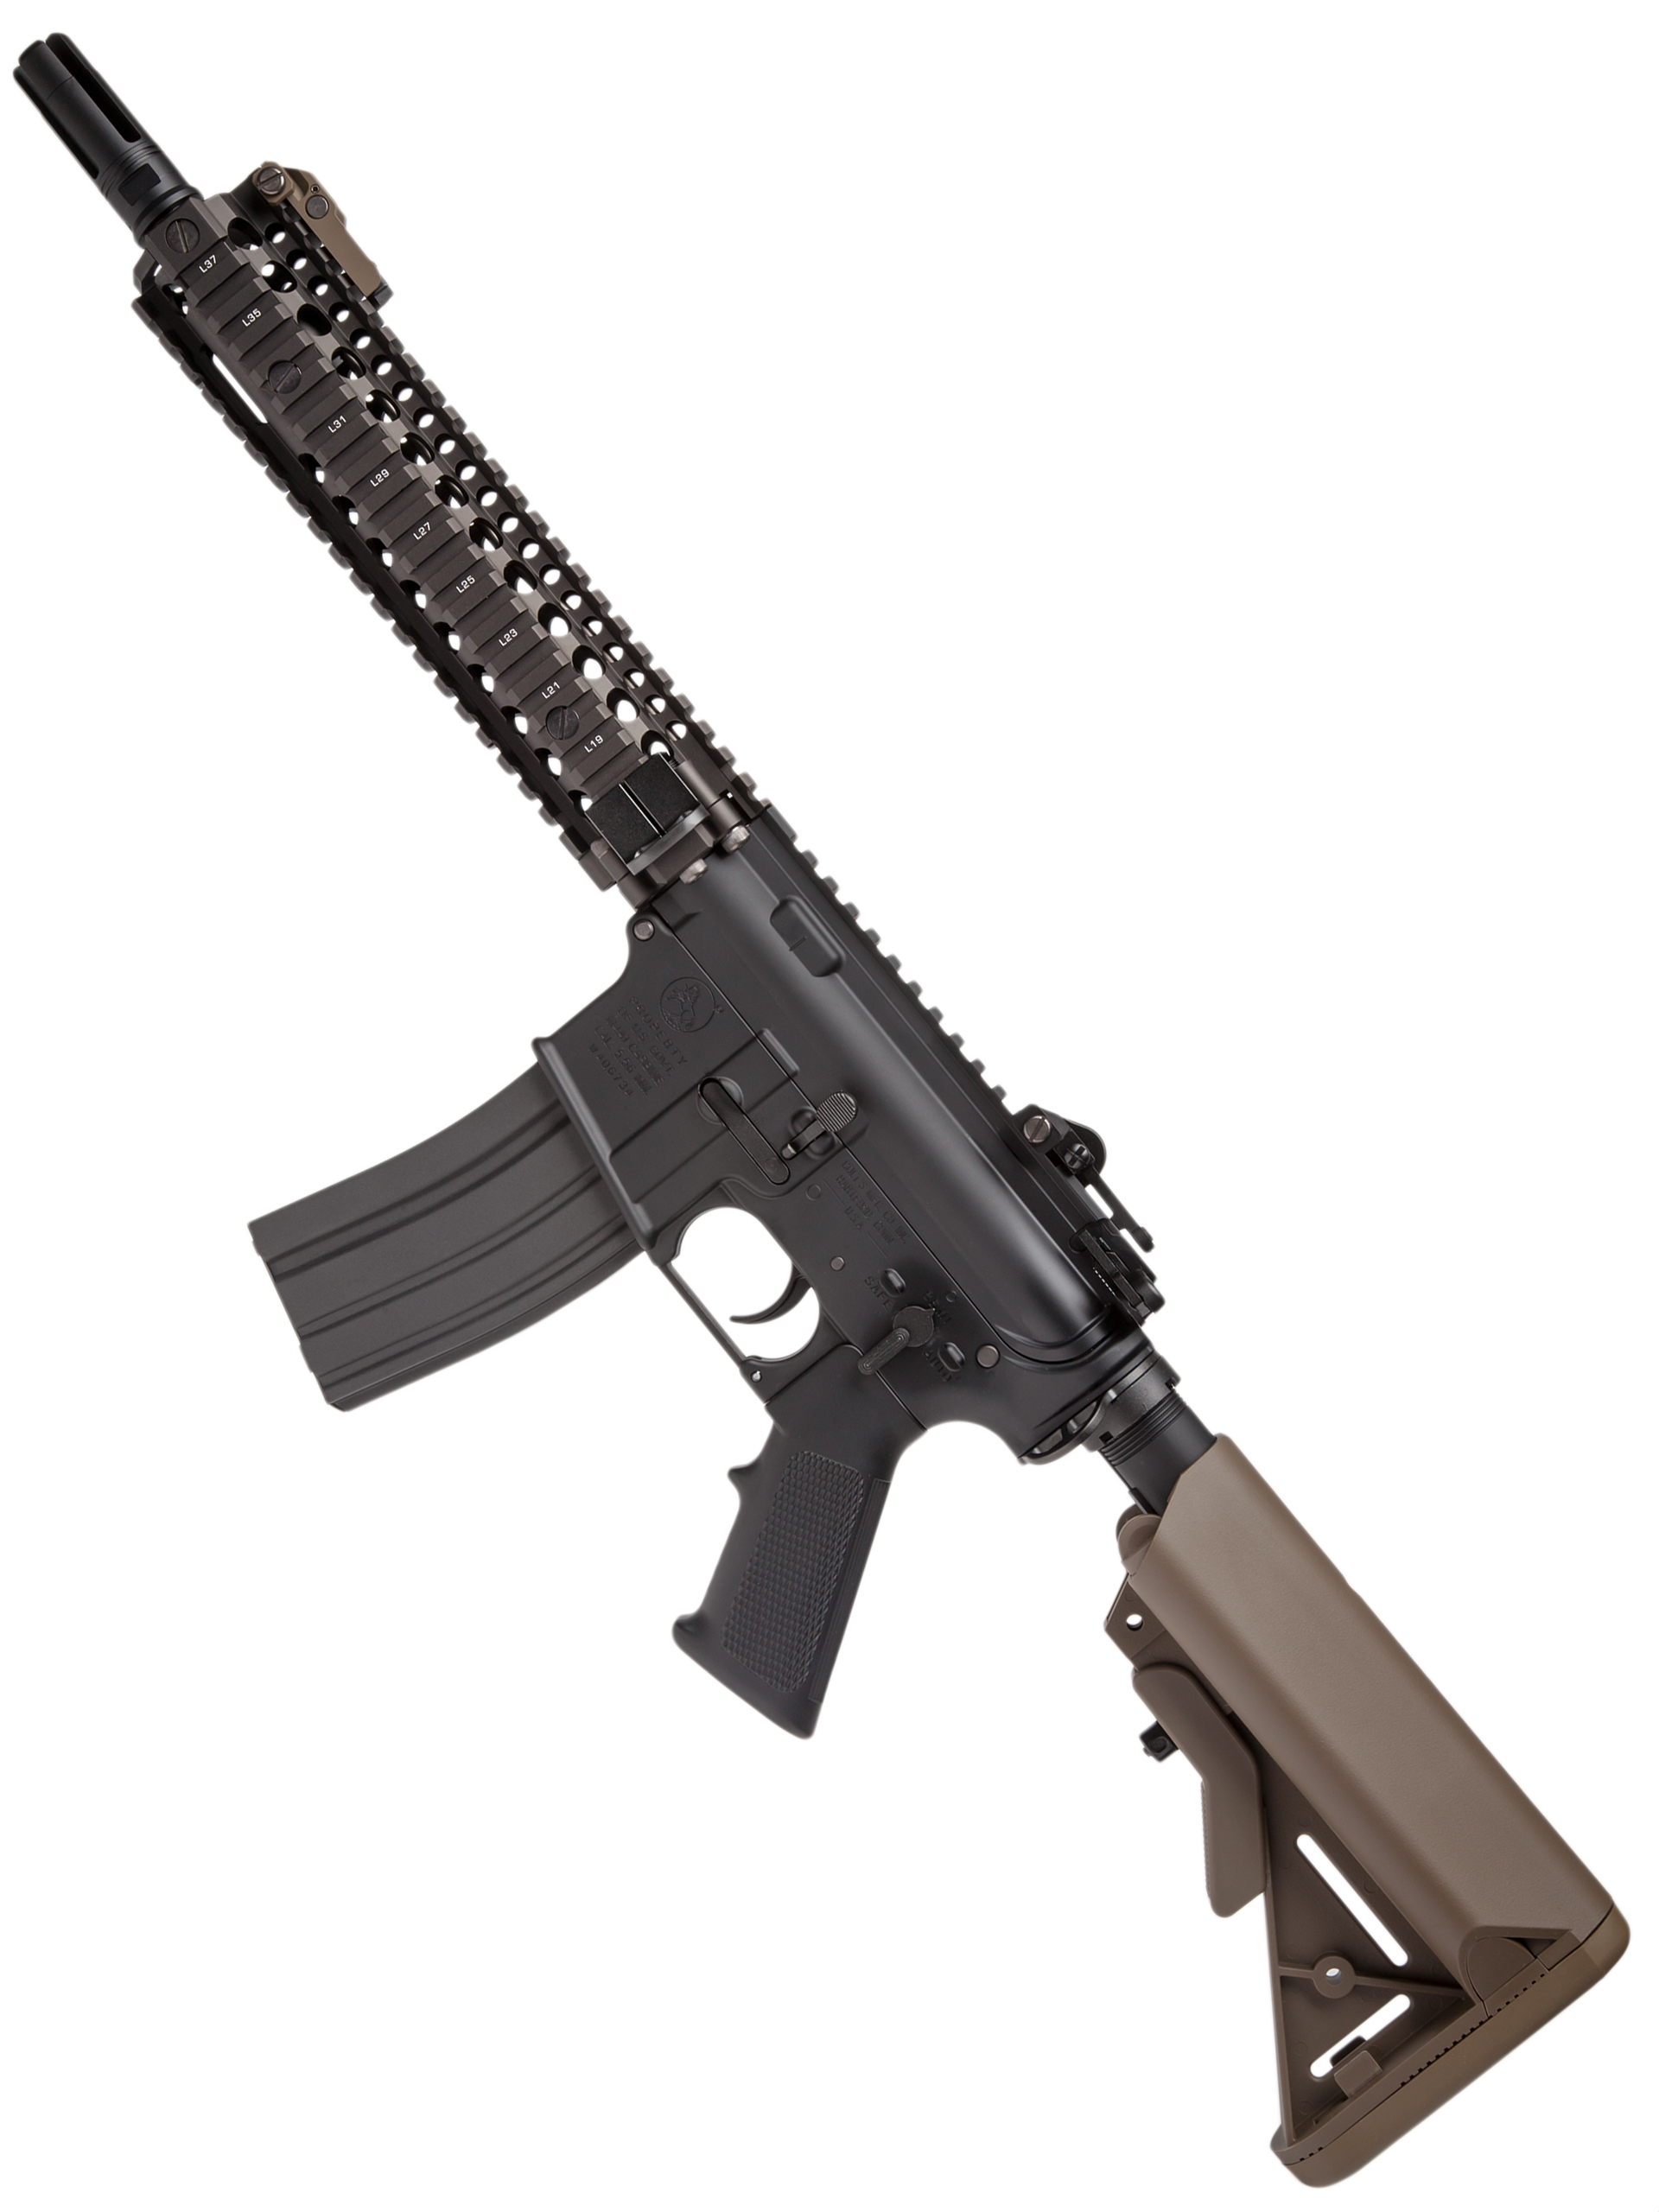
As his primary weapon, ODST2B9 runs a Tokyo Marui MK18 MOD.1 NGRS with some choice accessories which can be swapped out depending on the skirmish site and environment. The Tokyo Marui NGRS series of rifles is a fine choice for those who appreciate realism and an immersive Airsofting experience.
The MK18 MOD.1 was not ODST2B9s original choice, though due to an unfortunate happenstance his TM416 DEVGRU was destroyed, and the MK18 was its replacement. The real steel MK18 is in use by all branches of US SOCOM, including the US Navy SEALS, Delta, MARSOC and Army Rangers, and fits in perfectly with any of these loadouts, or a generic special forces loadout if you are less of a stitch counter.
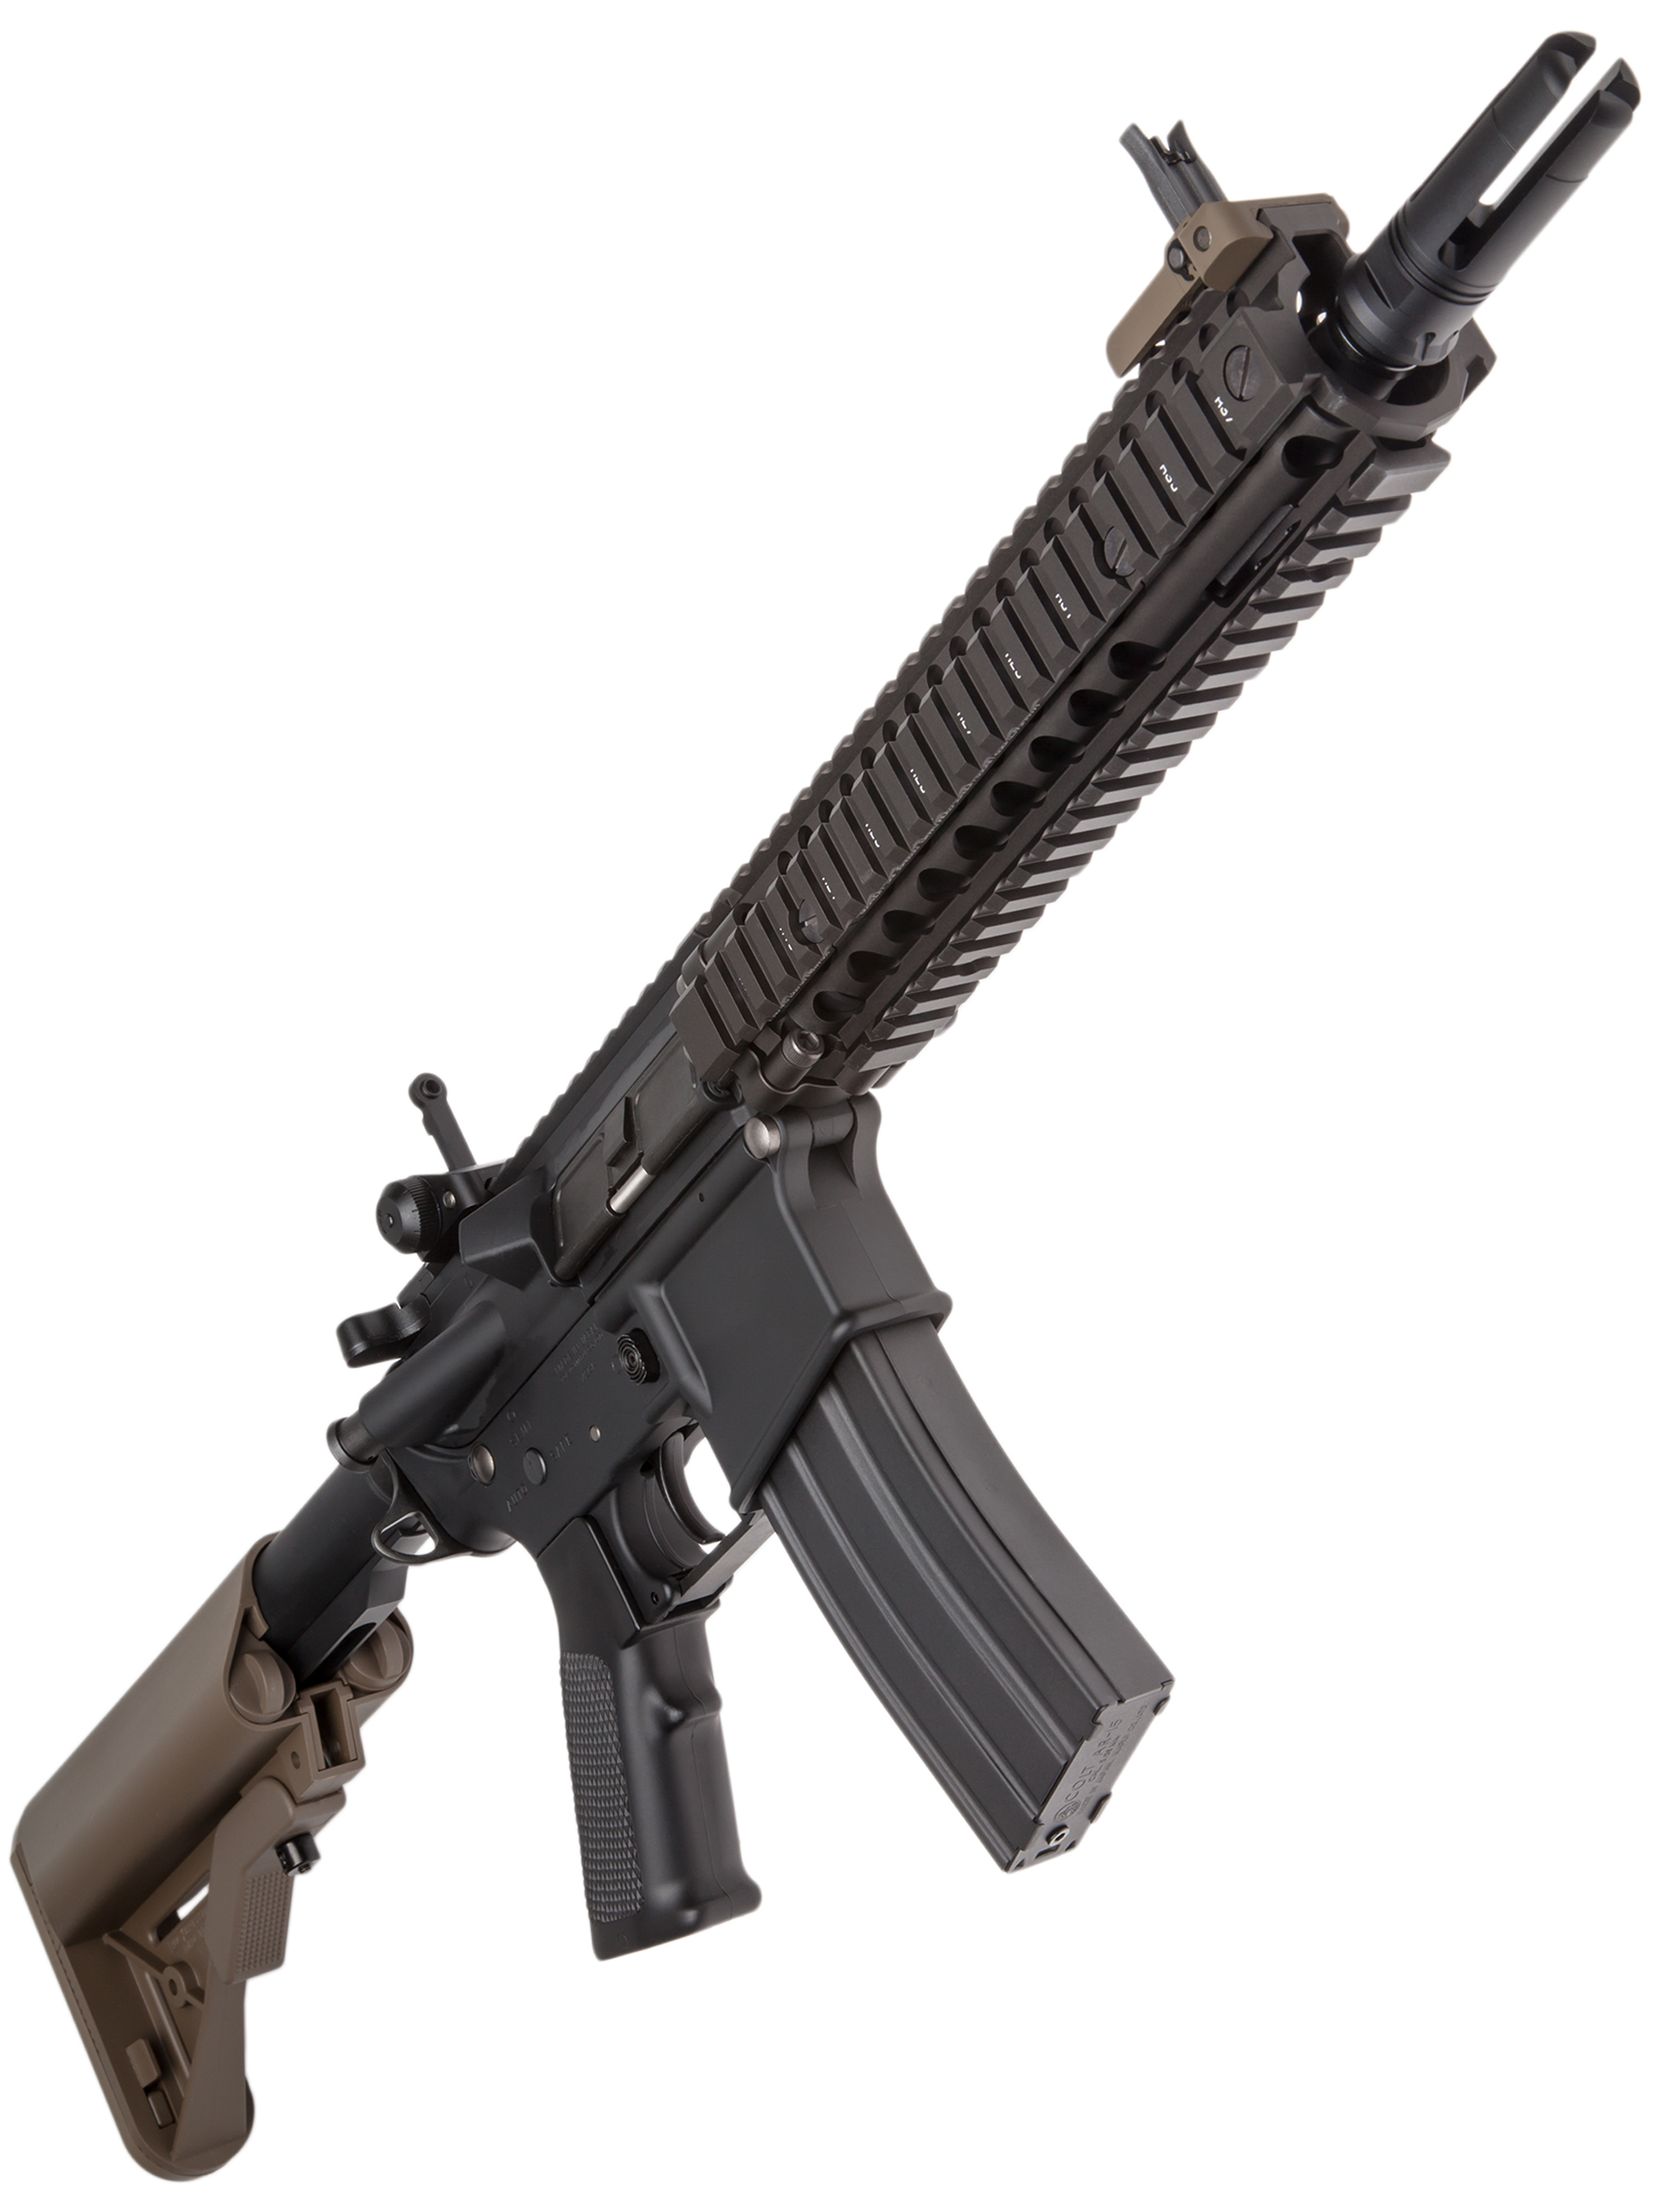
As it comes the Tokyo Marui MK18 MOD.1 is fitted with a 10.5-inch outer barrel with a 10-inch MK18 free float rail system anodised in bronze to match the real thing. Also fitted is a CQD style sling point, a relic of the older MK18 MOD.0, and a Crane battery stock in tan which is a fine choice for a SEAL kit considering it was the Navy SEALs who inspired the original "Crane enhanced carbine stock" that our Airsoft Crane stocks are based upon. The MK18 also includes flip-up iron sights, and although ODST2B9 prefers an optical sight they remain on the rifle for emergency use.
The NGRS system offers a bit more than a standard AEG in the realism department, and a clue about one of these advantages is in the name itself. The MK18 MOD.1 uses a recoil system, known by Tokyo Marui as the "Next Generation Recoil Shock" system, which involves a moving recoil weight which is driven by the gearbox and provides a decent kick with each shot. When asked about the recoil system, ODST2B9 said:
"When firing, you can feel the recoil system, not as heavy as the BOLT Recoil Series, or a GBBR however, it is significant enough to be comfortable. The Recoil feature adds a level of realism to the gun, and the Tokyo Marui platform is the perfect place to begin for anyone seeking the next level of AEGs."
The realistic feature set of the Tokyo Marui MK18 MOD.1 doesn't end with the recoil system, it also copied the Systema PTW's homework and introduced a "bolt stop" system into the rifle. This is one of the major reasons NGRS AEGs are so popular with the Milsim crowd and provides a perfect compromise between the performance of an AEG and the realism of a GBBR. The "bolt stop" activates when an NGRS low or mid-cap magazine runs dry, and stops the rifle from firing until a new magazine is inserted and the bolt release on the left side of the receiver is pressed.
"One of the most unique features of the NGRS, that only GBBRs seem to include, is the bolt stop/locking feature. This means just like the real steel counterpart, when the last round is fired, the bolt locks back, or in this instance after a trigger pull there is no action. This separates the TM from normal AEGs and makes skirmishing with a TM NGRS that much more immersive and realistic. To proceed you will need to load a fresh magazine and gently tap the bolt release button on the left side of the receiver; an awesome feature!"
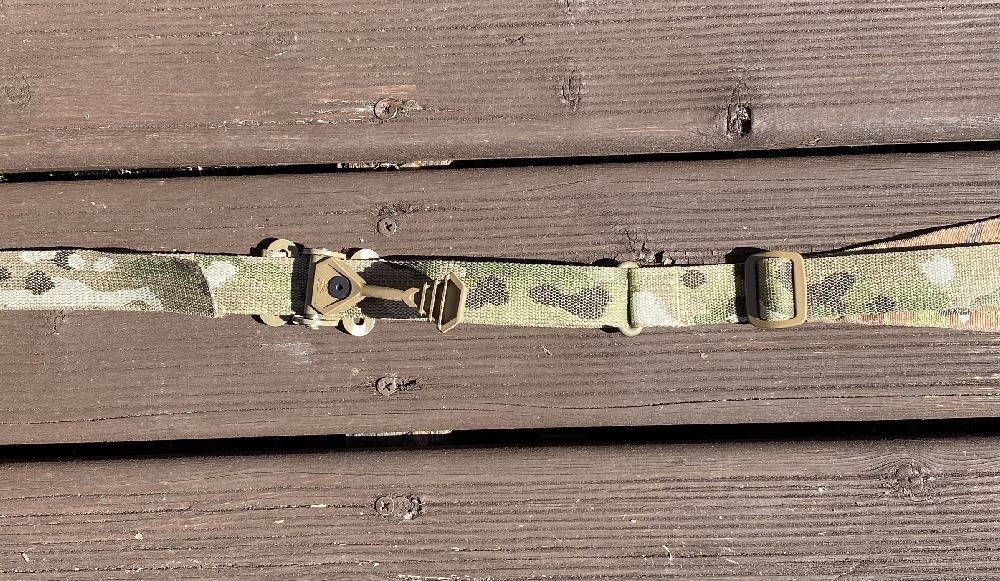
When accessorising his MK18 one of the most important things ODST2B9 considered was a top-quality rifle sling, and with this in mind, he slings his BB slinger on the Ferro Concepts Slingster. Many will feel their stomach drop when the price of the Slingster comes to light, though when you are running around with an expensive Airsoft rifle plus accessories, a good quality sling you can rely on not to dump your pride and joy into the dirt is an investment well made. When asked why he chose the Slingster, ODST2B9 said:
"The MK18 weighs around 3.2kg at its bare bones, but with all the additional accessories (PEQ-15, Flashlights, Optics etc) mounted, the weight will increase. I fear if I continued with a cheap sling then there is always the possibility of the weapon breaking from the sling, and splatting on the ground, and the TM NGRS guns do not come cheap. So expensive gun = expensive sling (or high quality/real steel firearm sling).
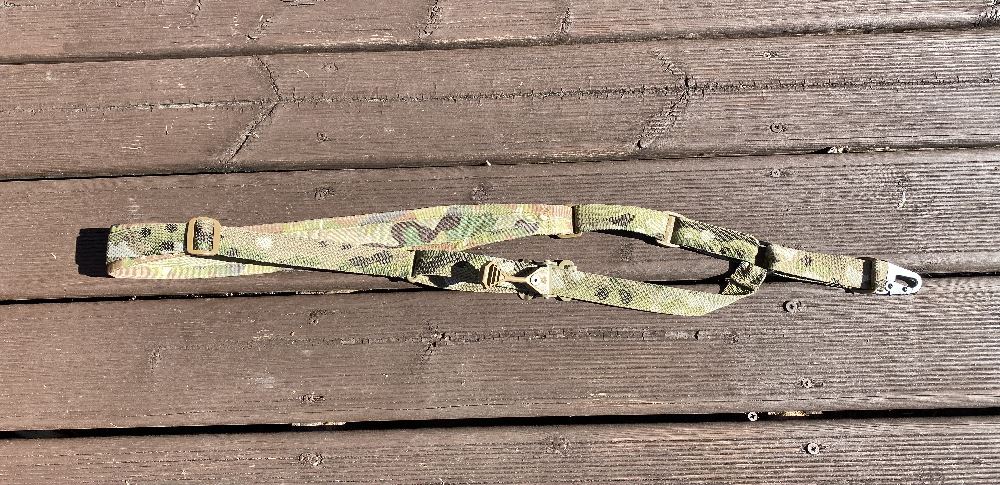
You can tension the slingster for a more accurate aiming stance or give more slack for operating in an environment where you may require to switch shoulders. The Ferro Sling has one unique feature above all other slings in my opinion and that of course is the Pull Tab. This allows the user ability to transition the weapon to the appropriate combat ready position depending on the scenario. The Pull Tab is a quick and efficient way to adjust the length of the sling without having to fiddle around with the fastening buckle.
The Slingster is far superior to any sling I have owned or used which is why it’s my number one recommendation for anyone looking for a high-quality sling for their gun, and of course, I just had to buy a second for my MP7 but a single point rather than a two-point."
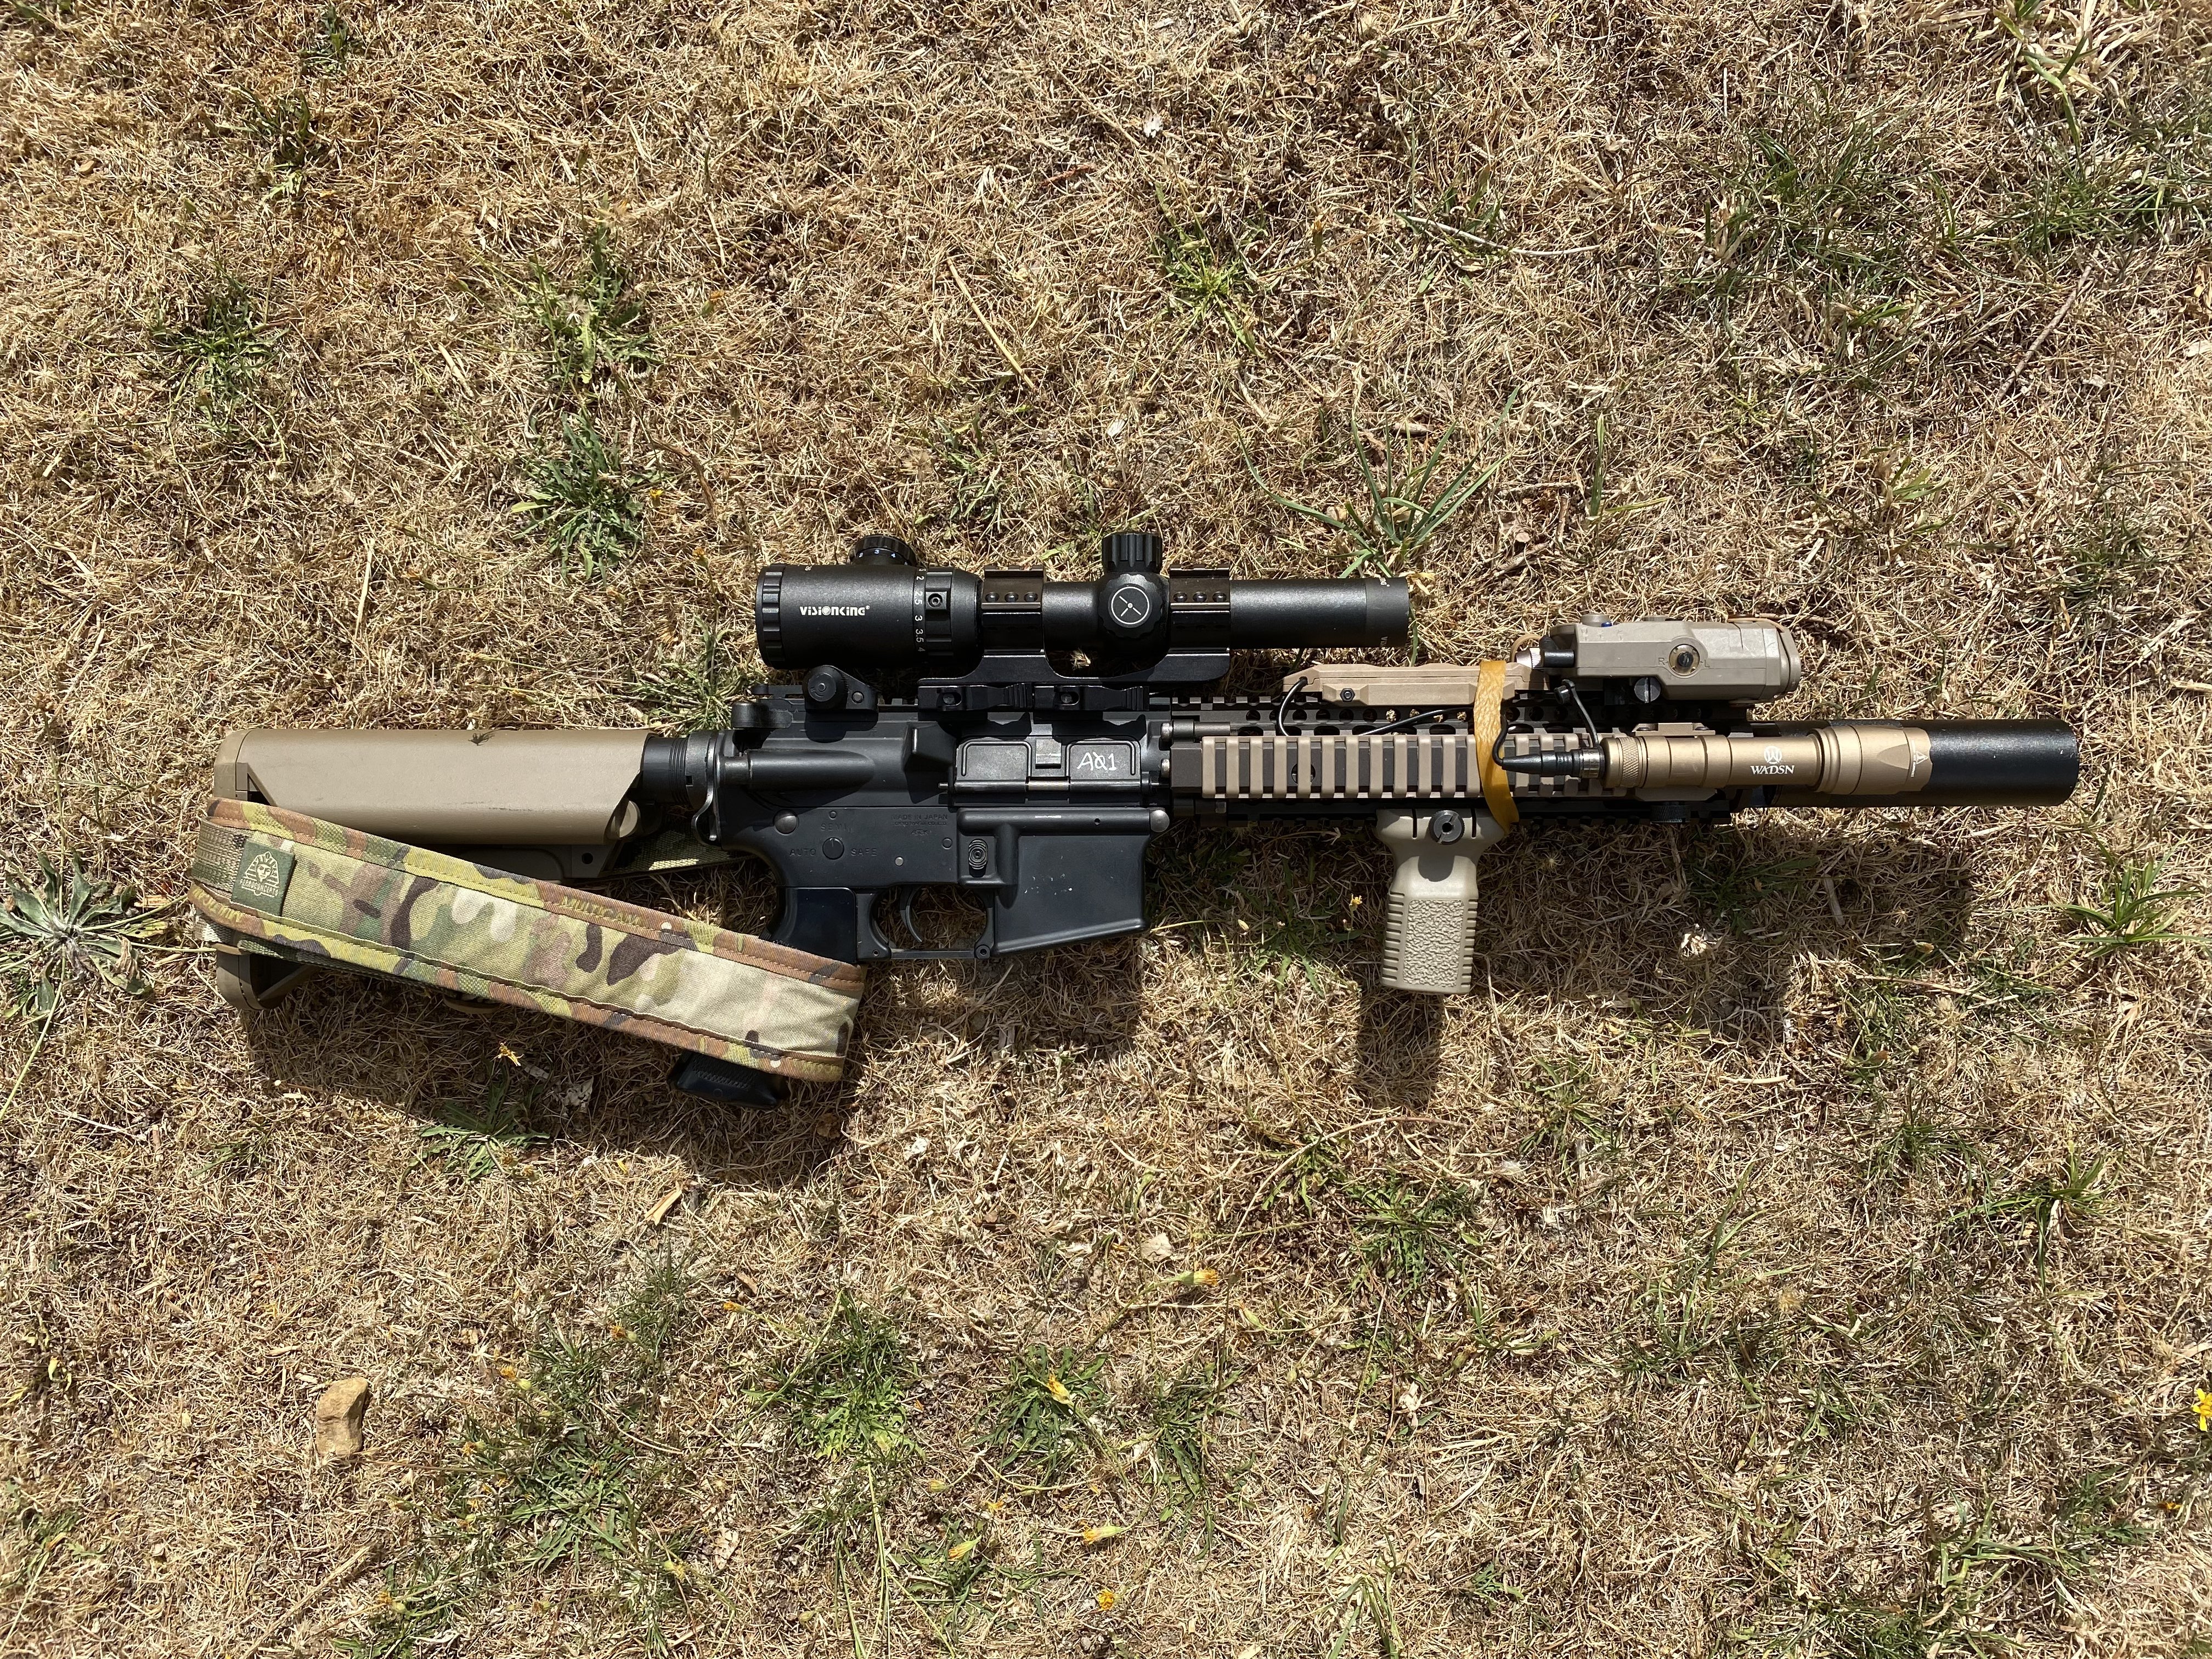
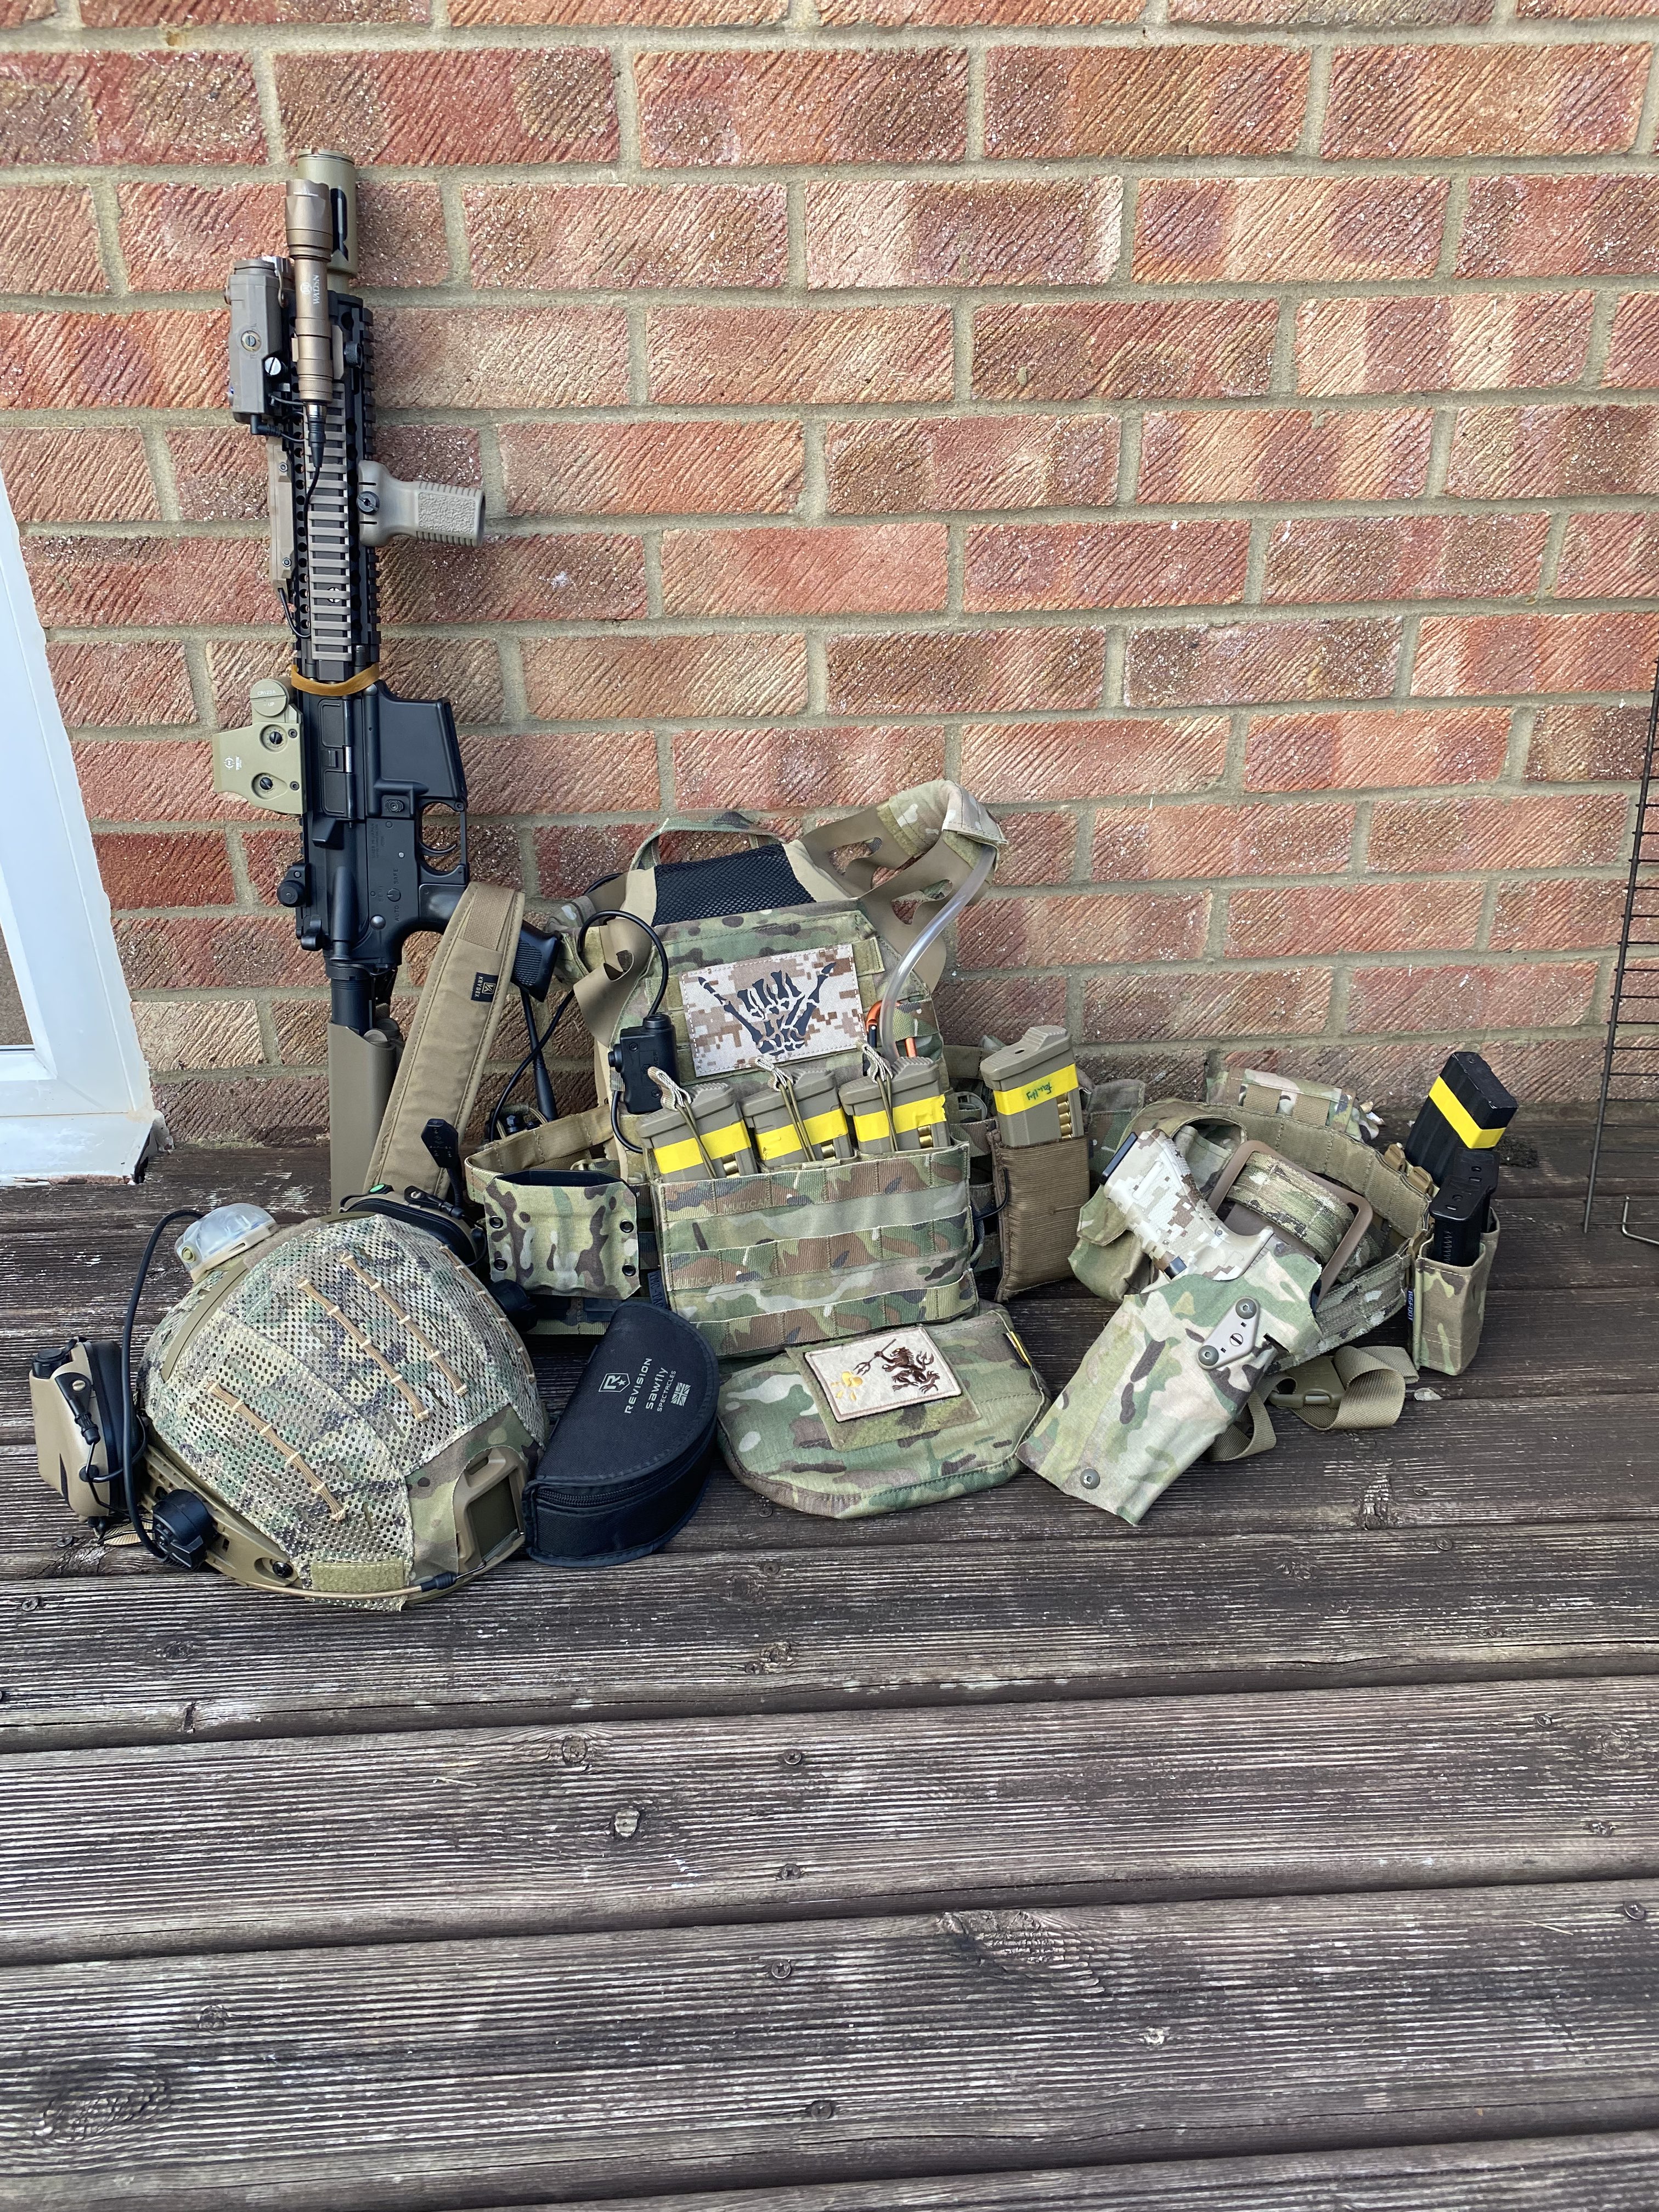
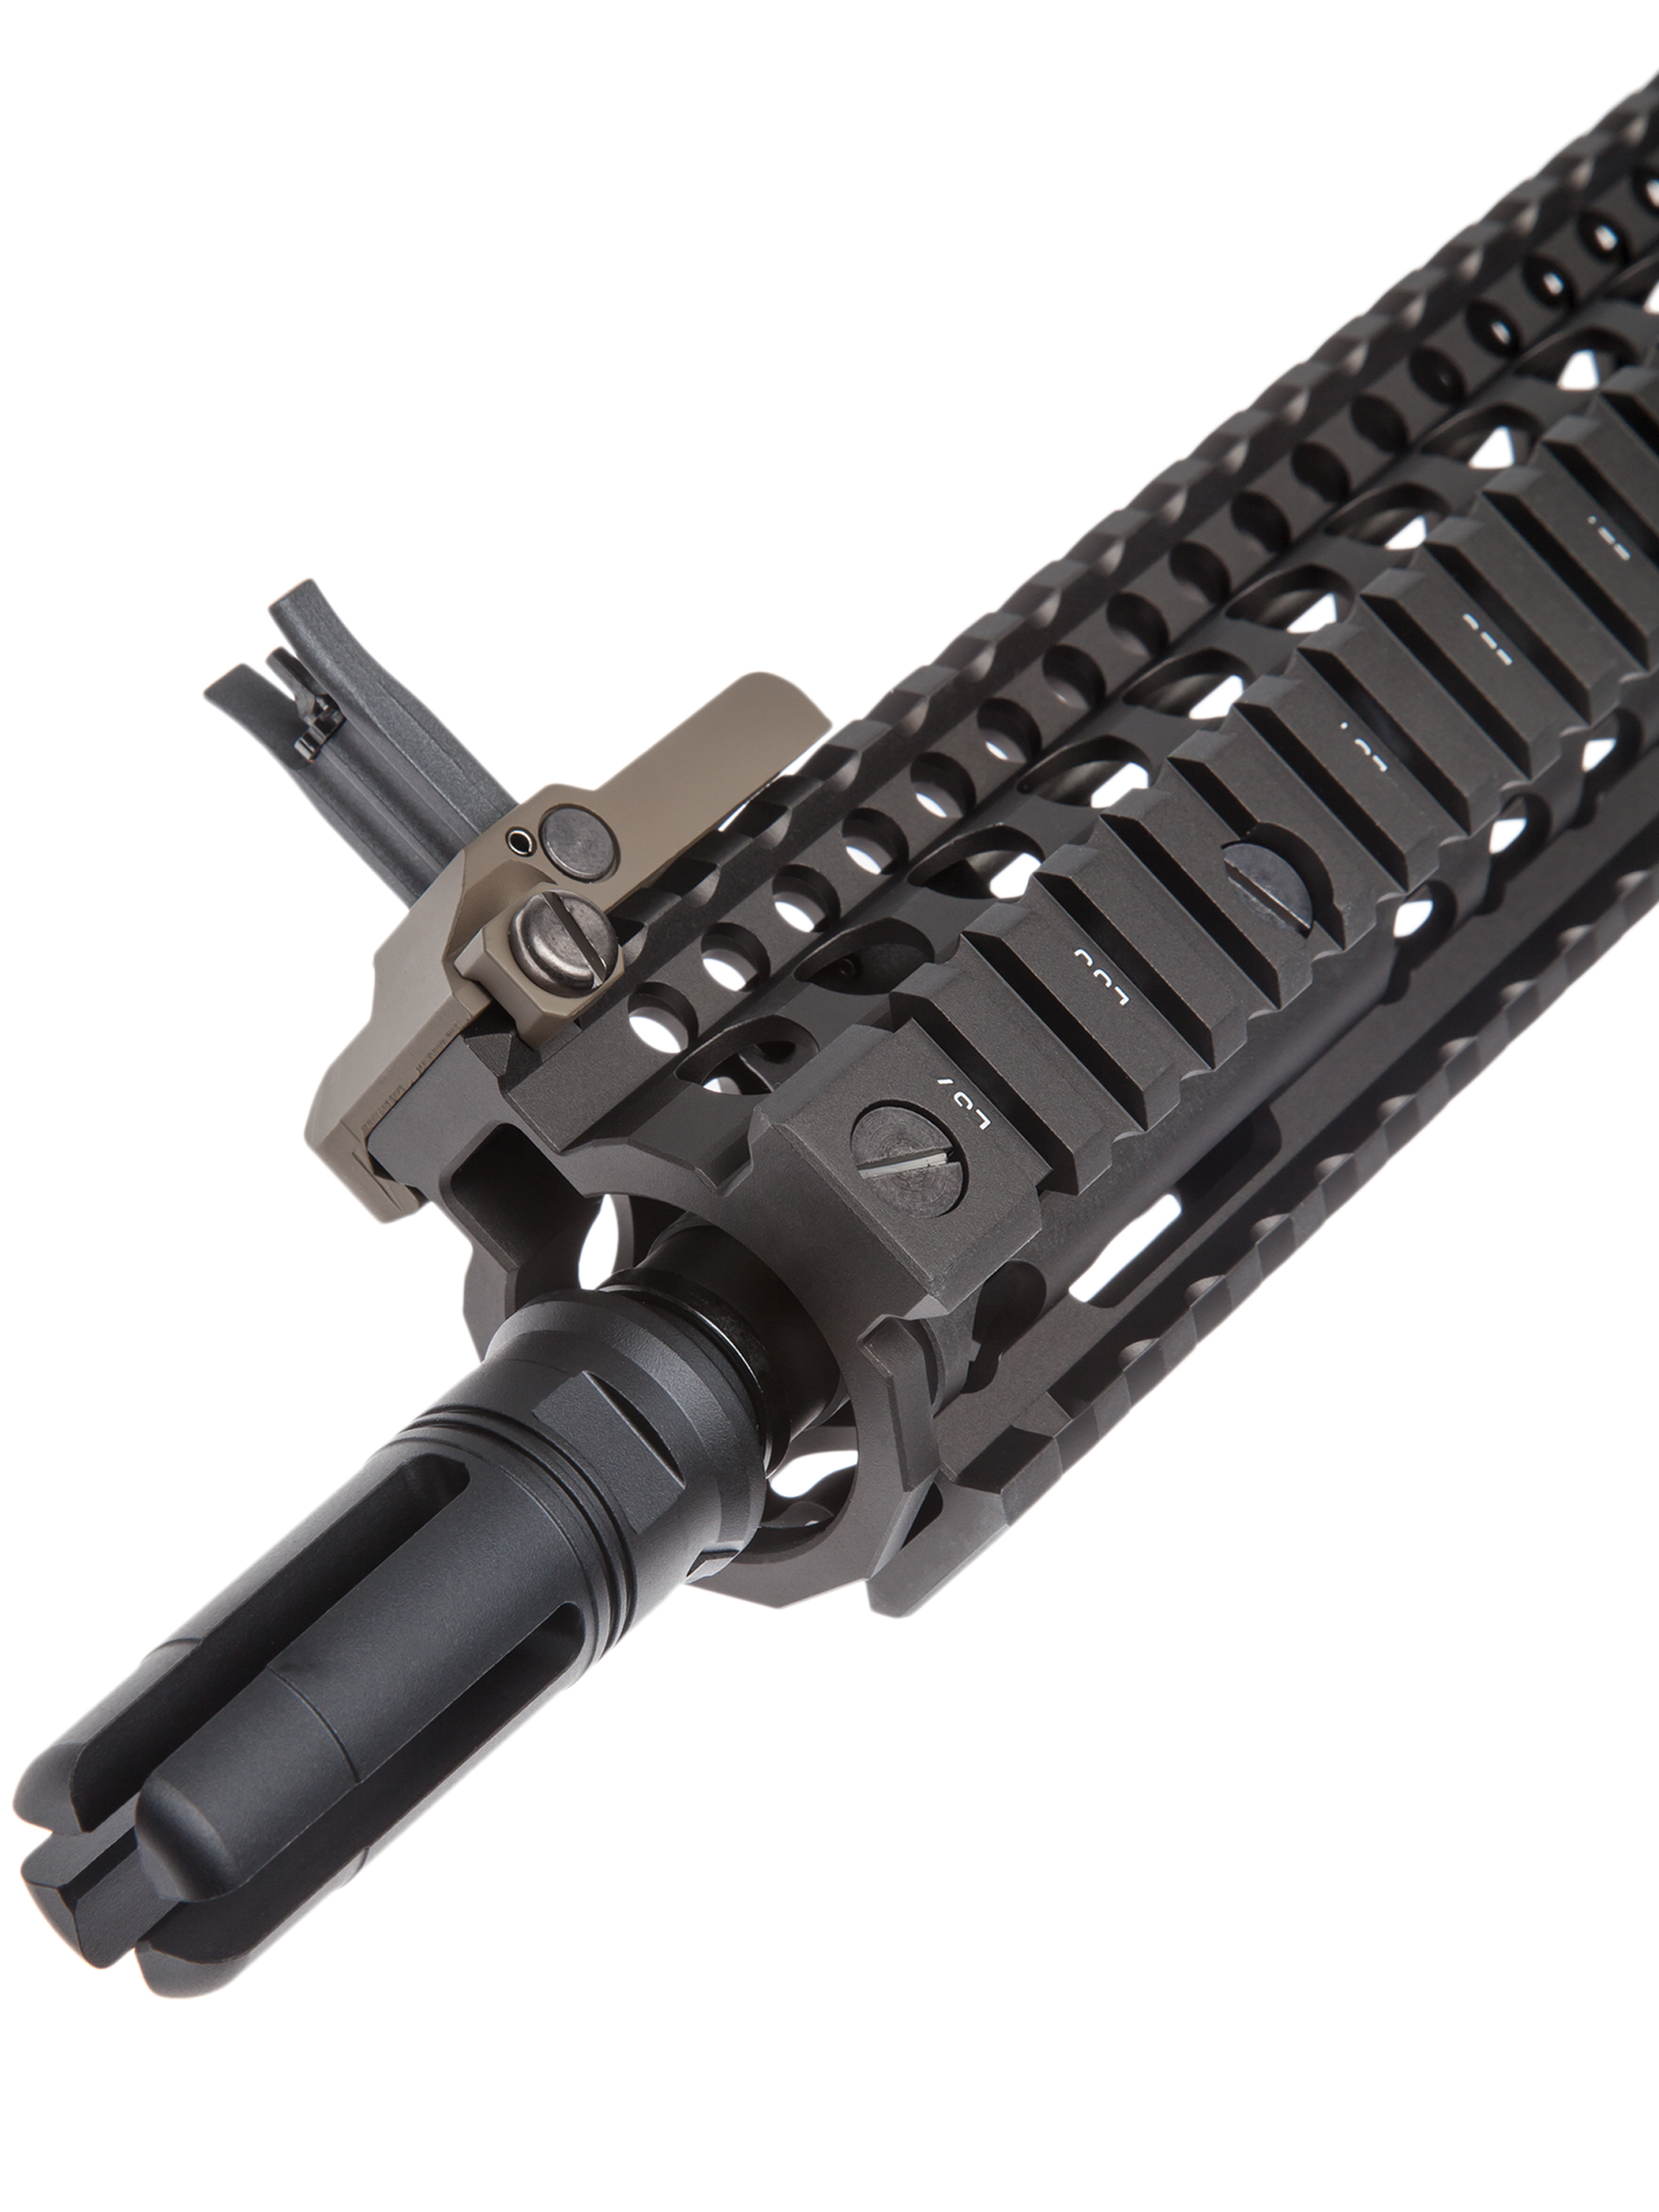
ODST2B9 takes pure advantage of the wealth of 20mm rail space on his primary and has kitted it out with a whole host of mission essential equipment. To fit the Navy SEAL look we can see a PEQ-15 LA5 and SF style M600 Scout Light from WADSN which ODST2B9 runs through a WADSN Dual Pressure Switch, giving him control over the white light and laser functions of his illumination devices through a single position on his rifle which keeps the setup simple with minimal snag points whilst offering full functionality.

ODST2B9 generally selects his optical sight based on the environment and the skirmish site he is attending, choosing a Vision King 1.5-6x30 "Short Dot" style LPVO optic for larger skirmish sites wherein he can make the most of the TM MK18 NGRS's fantastic HOP-up unit, and a Vector Optics Maverick Gen.II red dot sight for close quarters work when getting the first shot off when entering a room is of extra importance.
Up front, the MK18 is equipped with either an ASG B&T Tracer unit or a NUPROL BOCCA Sound amplifier which ODST2B9 swaps out as he sees fit, making use of the Tracer unit for night games and low light skirmishes, and the sound amp for extra intimidation factor in CQB.
If you are interested in learning more about ODST2B9's Navy SEAL inspired MK18 MOD.1 Airsoft setup, and his massive pile of fancy accessories which allow it to be used in a flexible way and fulfil multiple roles on the battlefield, keep your eyes out for a future blog on this ultra-slick MK18 MOD.1 AEG!
The Sidearm - Raven EU18C GBB w/NUPROL NX200 - WE EU19 Gen.4 w/NUPROL NX200
ODST2B9 runs EU series handguns as his sidearm, either a Raven EU18C Hydro Series in AOR digital camo or a WE EU19 Gen.4 in plain but functional black. The EU19 is the more appropriate for his SEAL kit realism wise, but the EU18C has its own benefits including the fully automatic function and its attractive and effective digital camo finish.
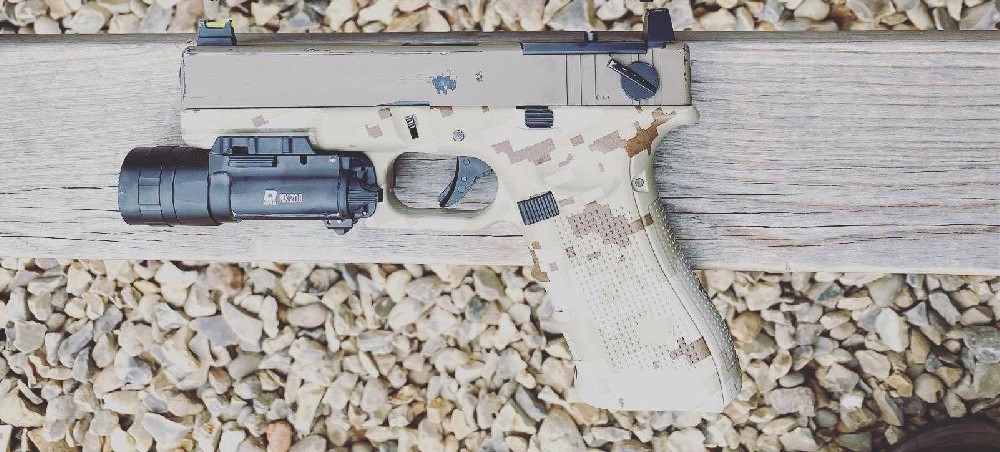
The Raven EU18 was ODST2B9's first sidearm, and naturally, like all first guns, he has become attached to it. His particular EU18 was originally the BDS version, but being a dedicated SEAL fan he wanted iron sights, so we helped him out by sourcing him a nice tan Raven slide without the BDS cuts so he could get rid of the raised iron sights and make his EU18 look a bit more like an issued combat pistol.

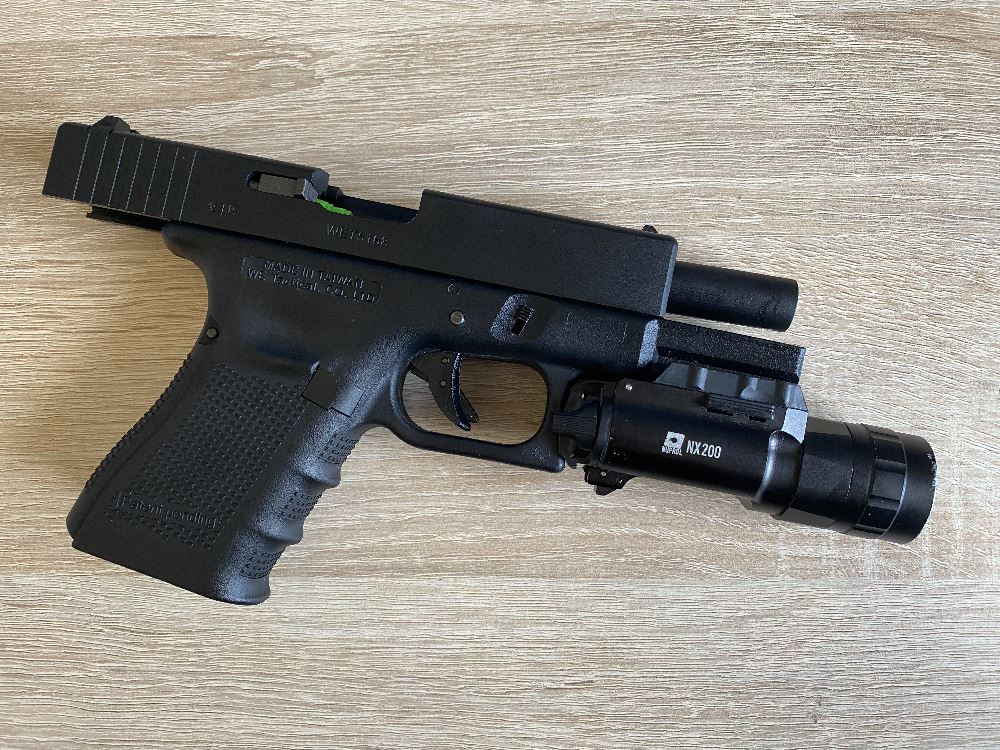
When looking for an alternative sidearm to his EU18, the EU19 Gen.4 from WE Europe was the natural choice. The real version of this pistol is currently issued to US Navy SEALs, and for Milsim games ODST2B9 makes use of his EU19 and the NUPROL NX200 tactical flashlight which fits perfectly in holsters designed for the larger EU pistols.
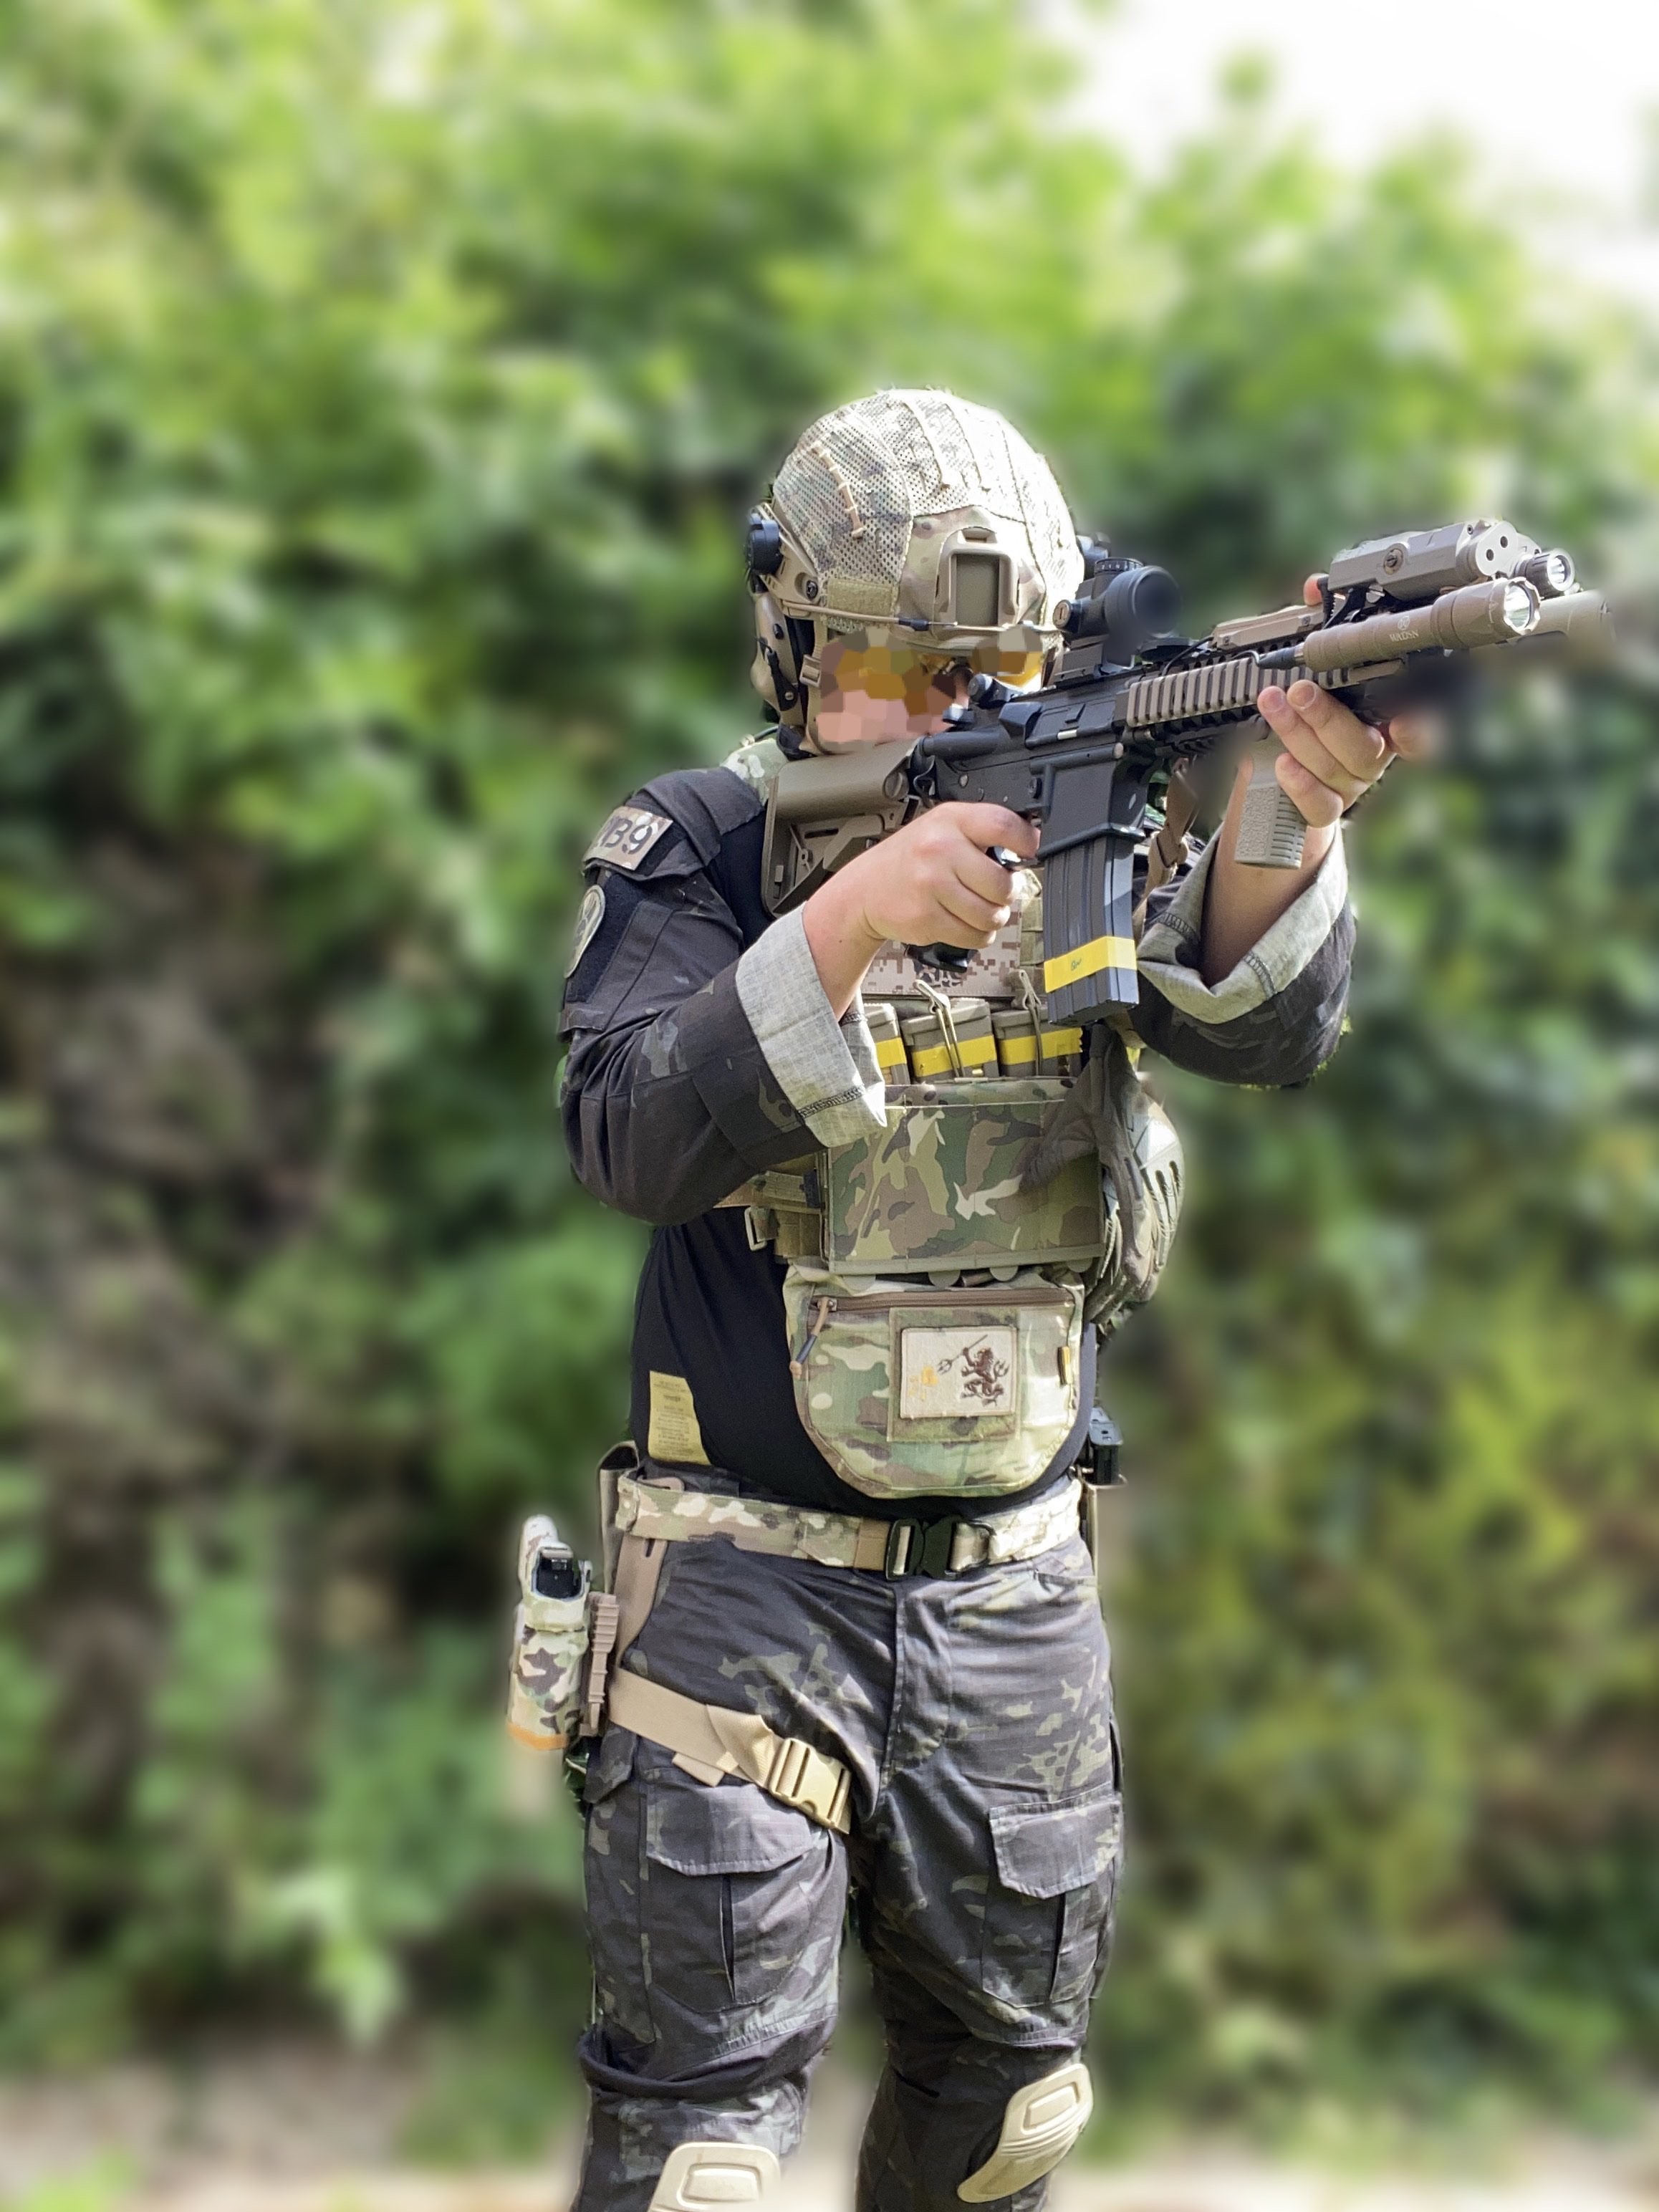
The Plate Carrier - Crye Precision JPC 2.0 in Multicam
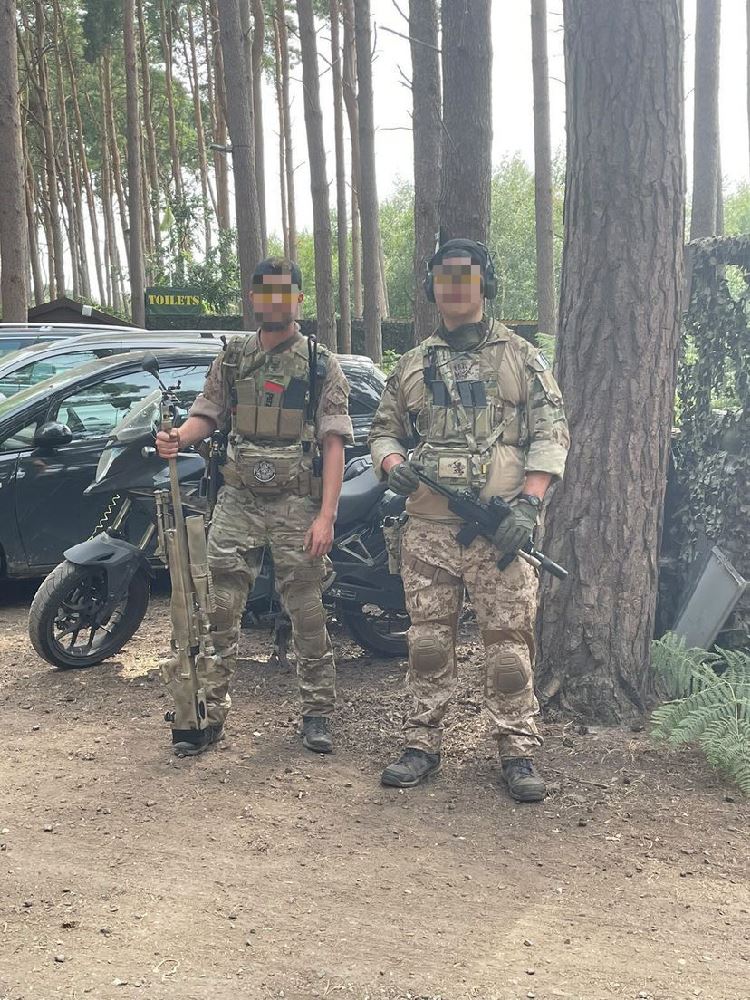
ODST2B9 can be seen on the right of the above pic, rocking his JPC configured for his MP7 and a high speed, low drag aggressive setup. This is a good opportunity for tall people to see what the super compact JPC looks like on a 6-footer!
The Crye Precision JPC 2.0 is a modern plate carrier designed for parachute jumps and has a low profile design with skeletonised cummerbund sides and MOLLE loops for the attachment of pouches. This carrier is one of the many considered to be "SEAL approved", and is manufactured by Crye Precision in the US which is known to be one of the top kit manufacturers in the world at the moment.
Perhaps more famous for their G2 and G3 combat uniforms, Crye has equipped many of the big names in Military and LEO units, including UKSF, SFSG, Delta Force and US Army Rangers, to name but a few.

ODST2B9 prefers to use real steel kit for Airsoft skirmishing, not because it is essential but because he prefers the flawless quality of the original piece over replicas, which can be hit and miss for those with an eye for the details and a passion for realism, like ODST2B9.
When asked why he chose to rock the real thing for an extreme price premium rather than one of the many decent quality JPC replicas on the market he said "The JPC 2.0 works really well with a modern SEAL kit over any Airsoft replicas such as Viper or 8Fields as it not only offers another level of comfort but also its capability to attach additional pouches for equipment. The 2.0 has zippers on the rear plate bag which allows back panels to be mounted more securely. Also, it gives that extra amount of authenticity. With a replica such as a Viper Vcam plate carrier, the shade of the camo is much brighter and doesn't work well with Crye Cordura. For an accurate or very near accurate impression loadout, having the colours right just adds to the detail"
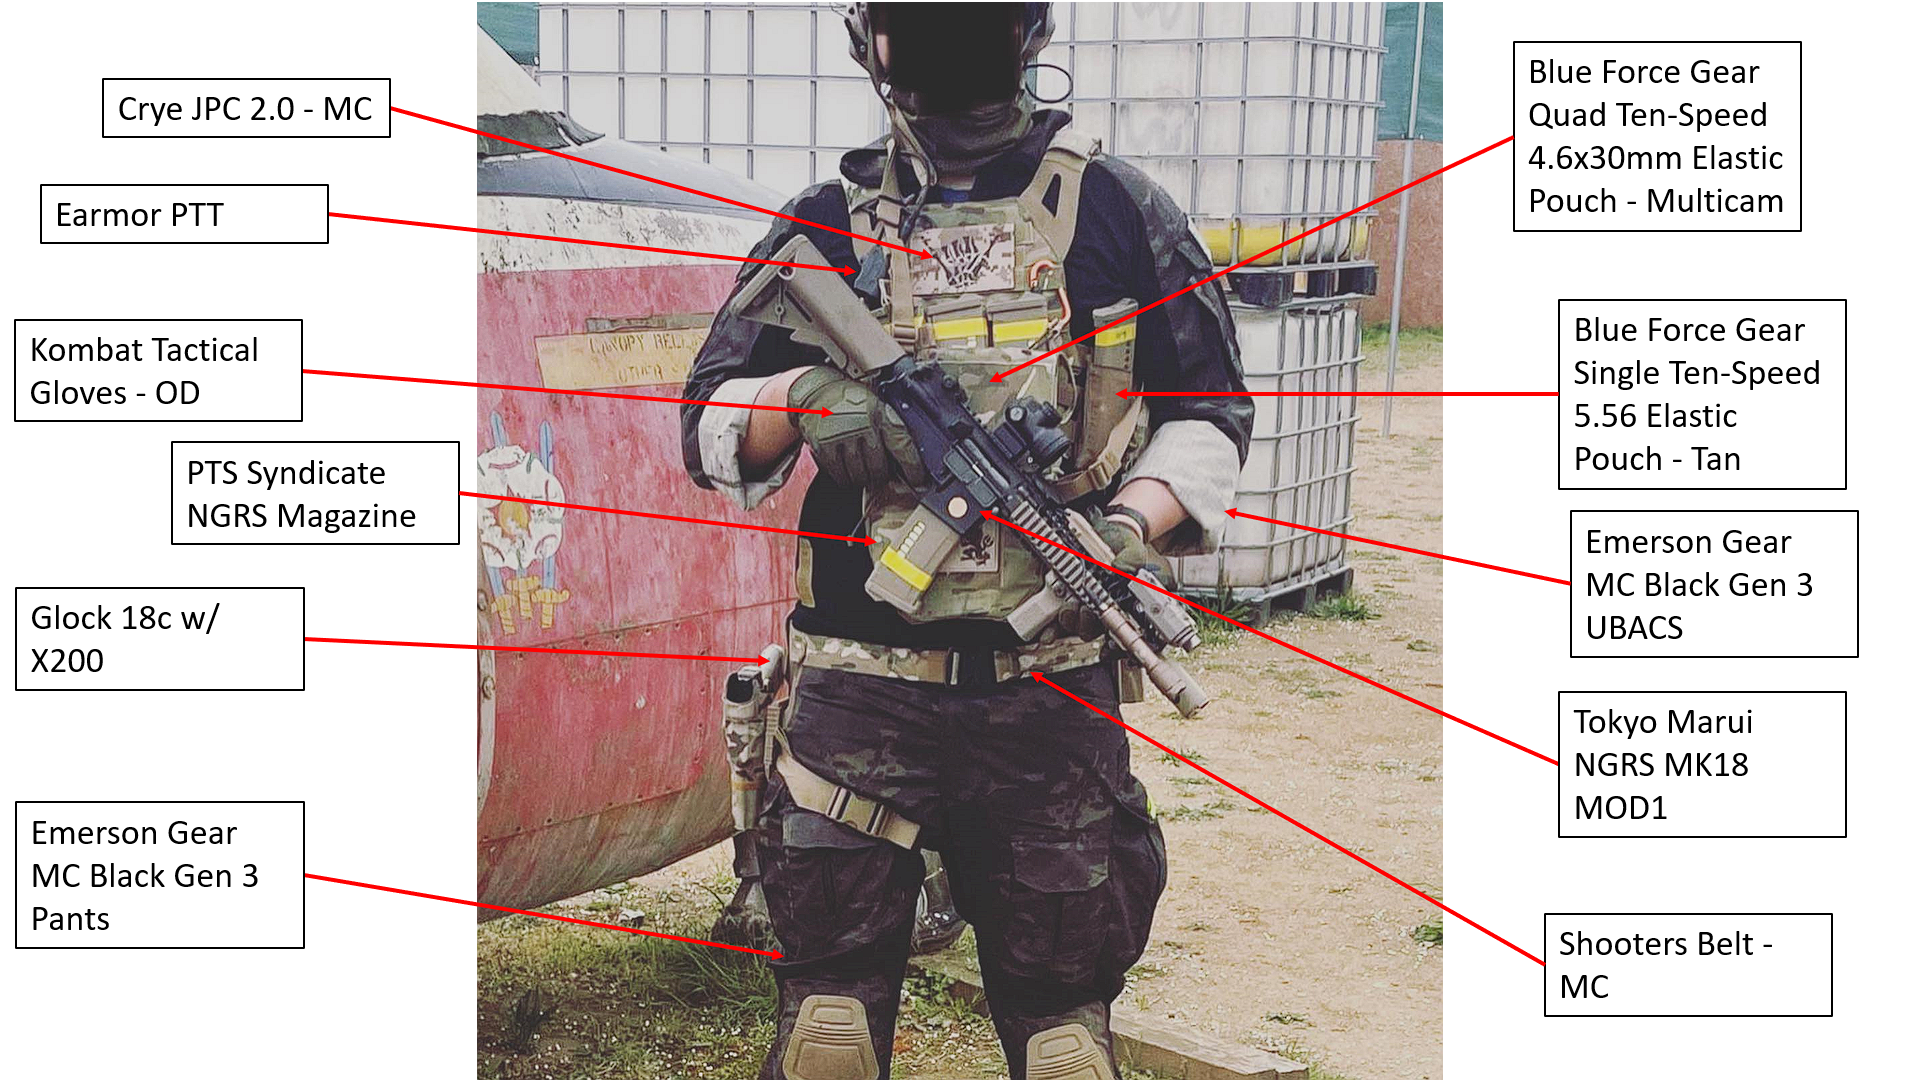
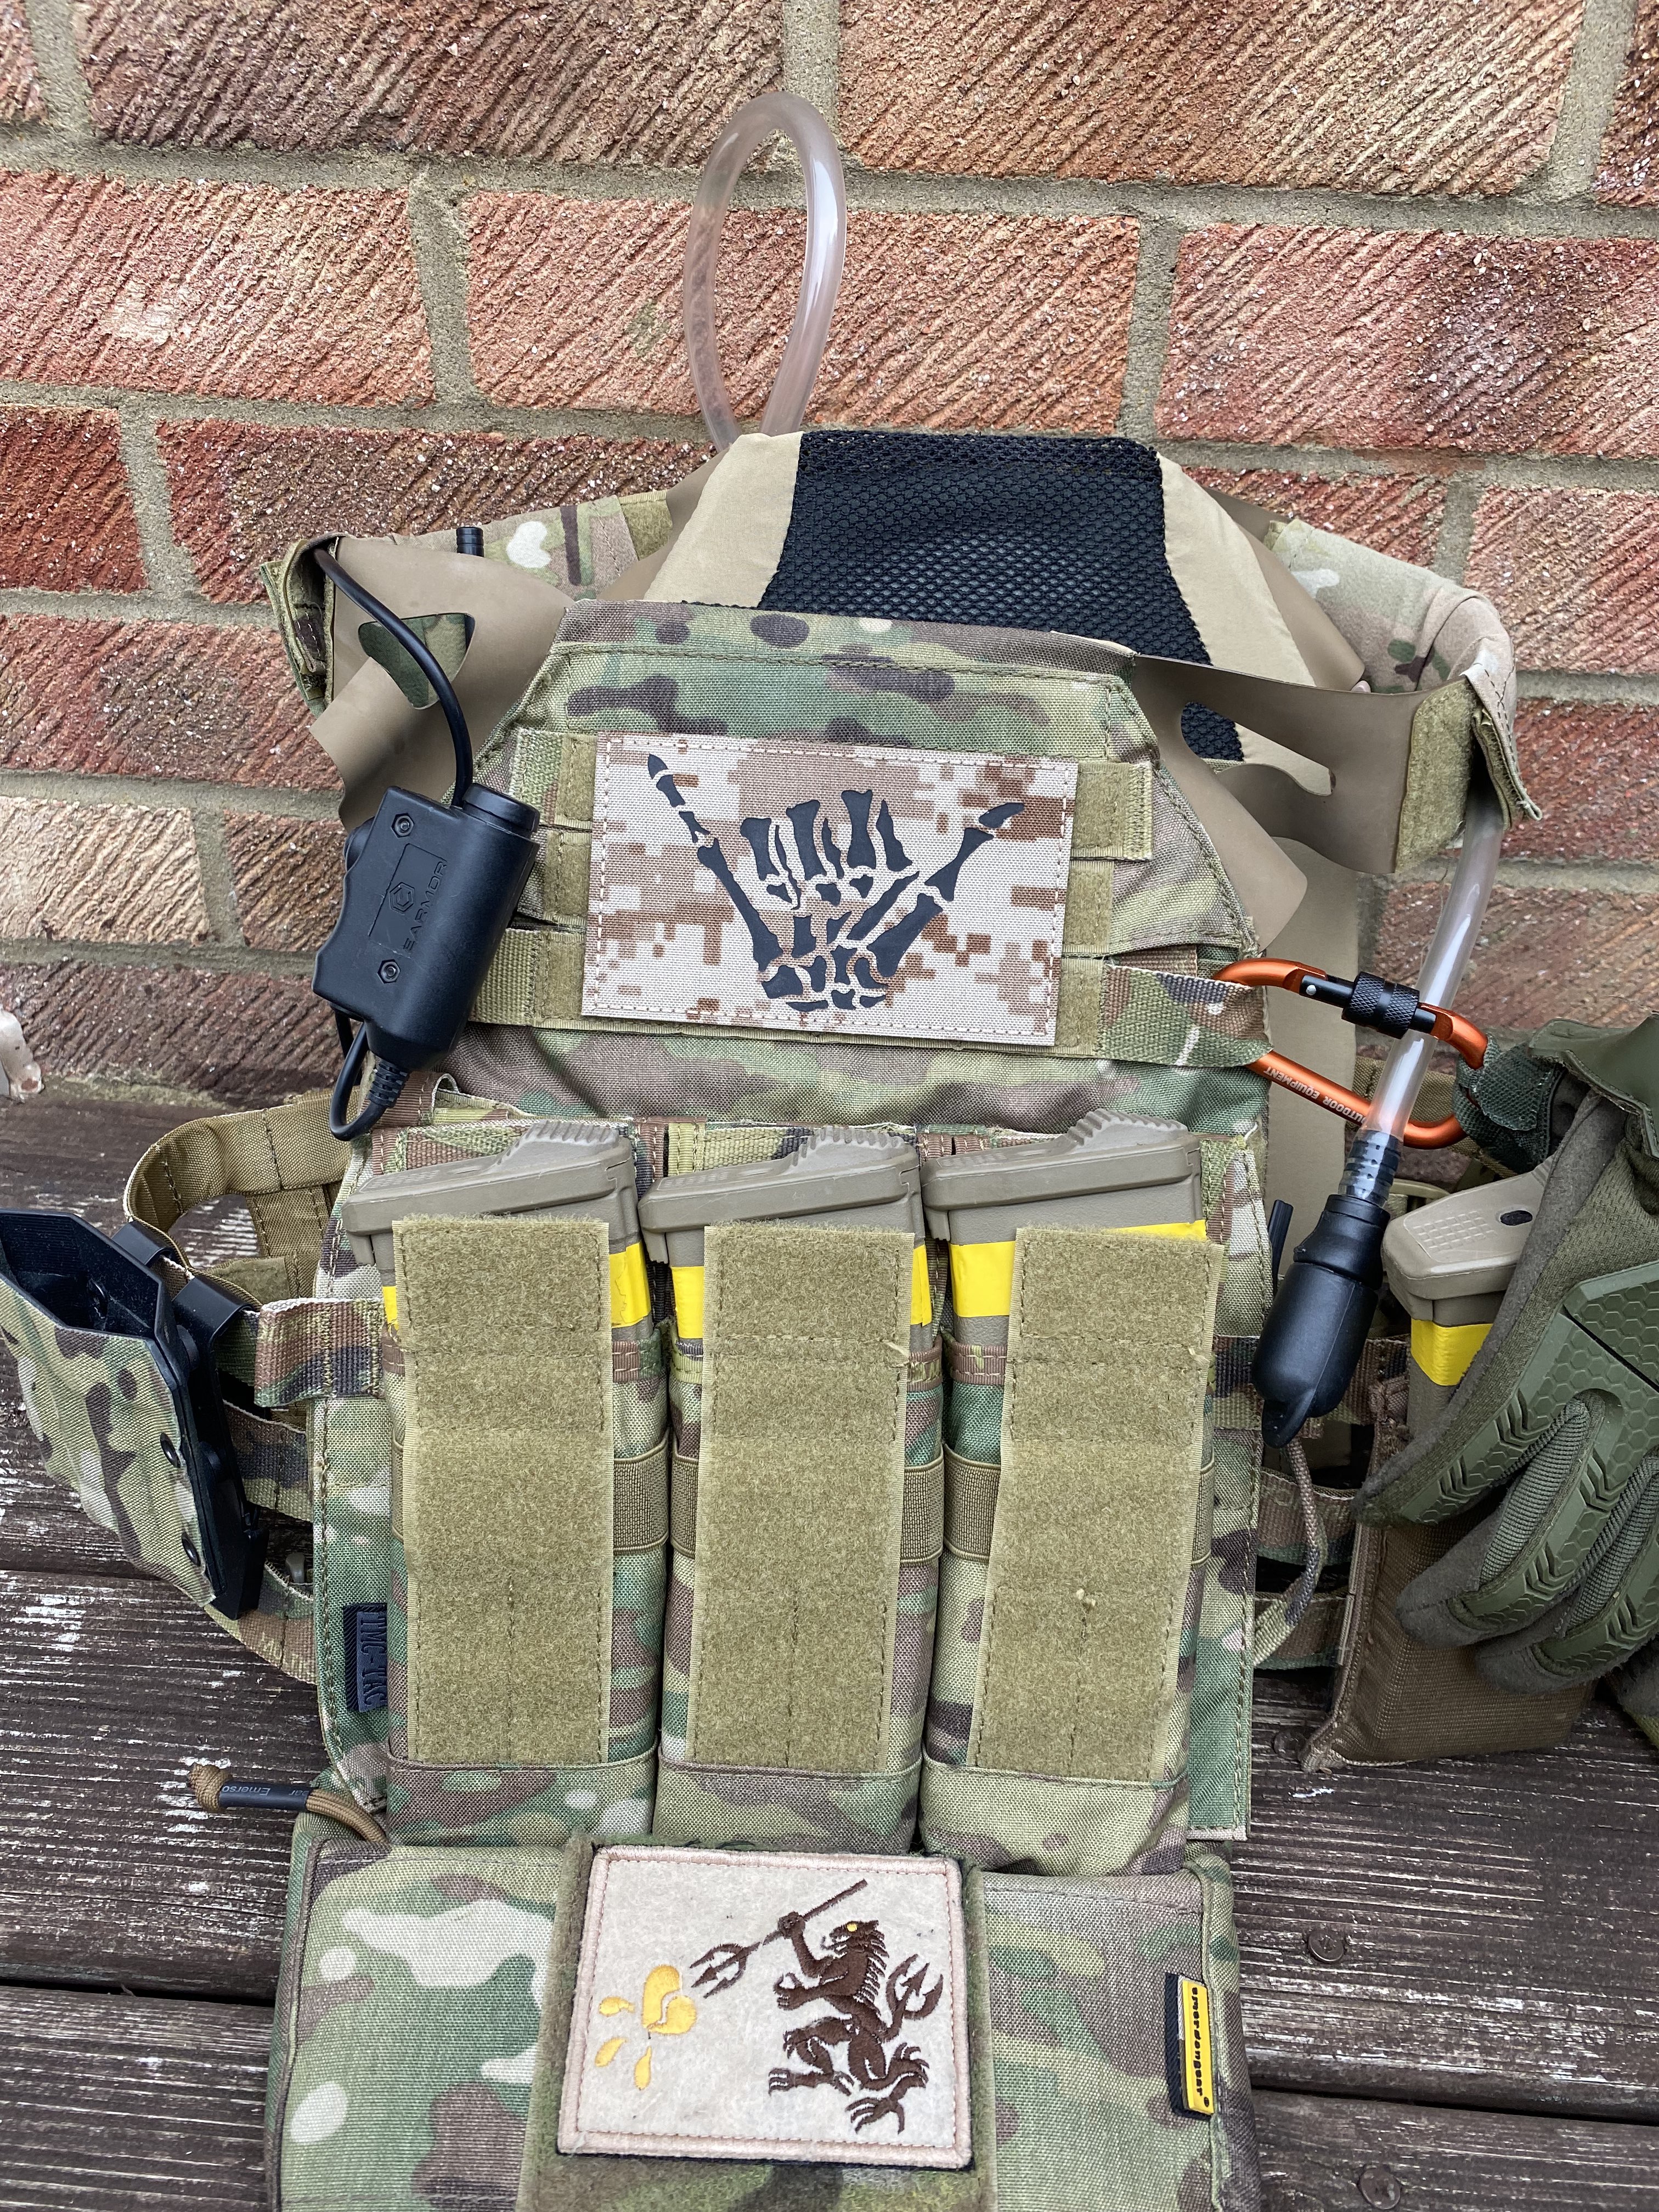
When it comes to setting up his JPC 2.0, ODST2B9 spared no expense setting it up exactly how he likes it, with the real steel kit his refined taste demands! And to help us get our heads around it, he made us these handy infographics. What a hero!
ODST2B9 makes use of the built-in front panel of the JPC 2.0 to hold 3 PTS EPM magazines for his TM MK18 and carries a 4th in a Blue Force Gear Ten-Speed 5.56 Elastic pouch on his left side.
Generally when setting up a MOLLE plate carrier or tactical vest magazines are most effectively stored on the opposite side to your primary shoulder to make sure you can easily reach your spare magazines with your support hand. ODST2B9 has done exactly that here, making for a slick setup which is very intuitive to use, and gives him less to think about when the plastic is flying!
SSsssshh, don't tell ODST2B9 we snook this paragraph in here, but if you want to do a decently accurate SEAL loadout without spending your rent money on Crye, you have a couple of options for JPC analogues.
The Viper Tactical Laser Cut Special Ops Plate Carrier Vest is based on the JPC design and has the recognisable shoulder straps of the JPC but with laser-cut MOLLE attachment loops instead of standard sewn-in loops. This means the loops are a lot stronger being part of the vest body itself, and the overall rig is lighter. If you squint, this looks like a JPC, but if you see ODST2B9 strolling over for a closer look you better run!
Another option is the Emerson Gear Lightweight Jump Plate carrier which is a close replica of the original Crye JPC. This would be a good one for those who want something a bit closer to the real thing than the Viper, though it doesn't have the zip attach back panel system of ODST2B9's real JPC 2.0.
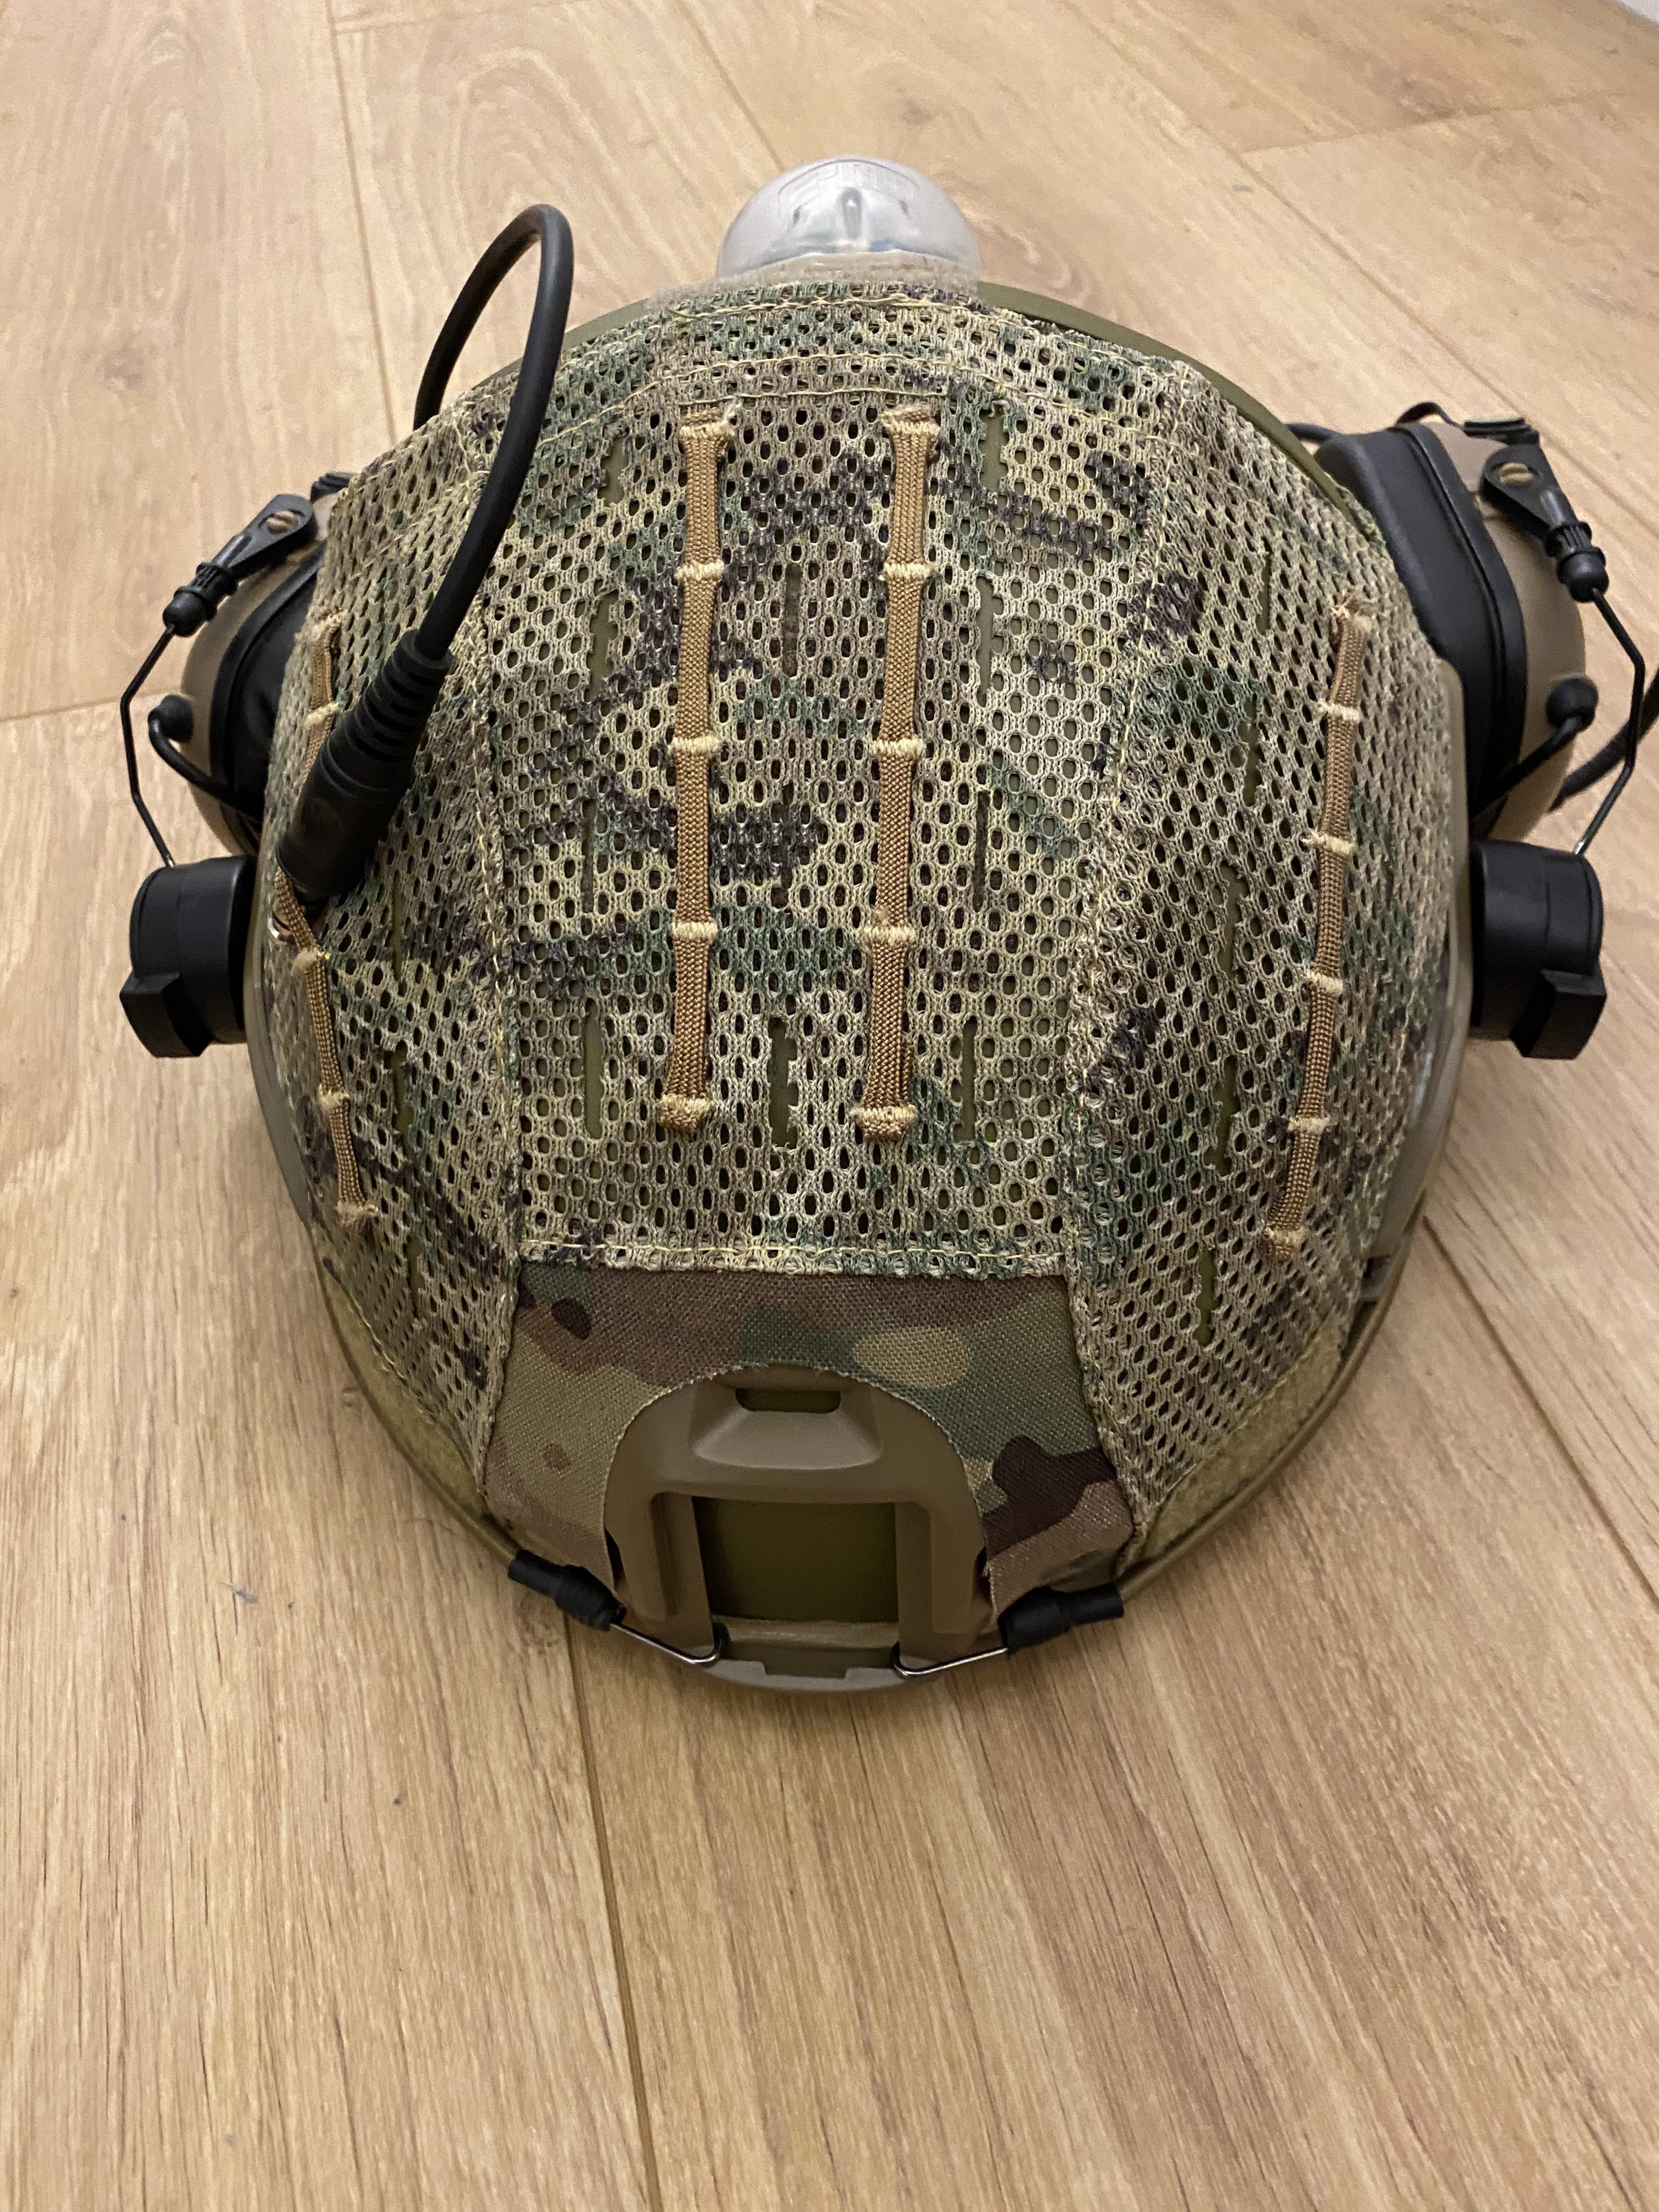
The Helmet - TMC Airframe Helmet with FMA Airframe Helmet cover in Multicam
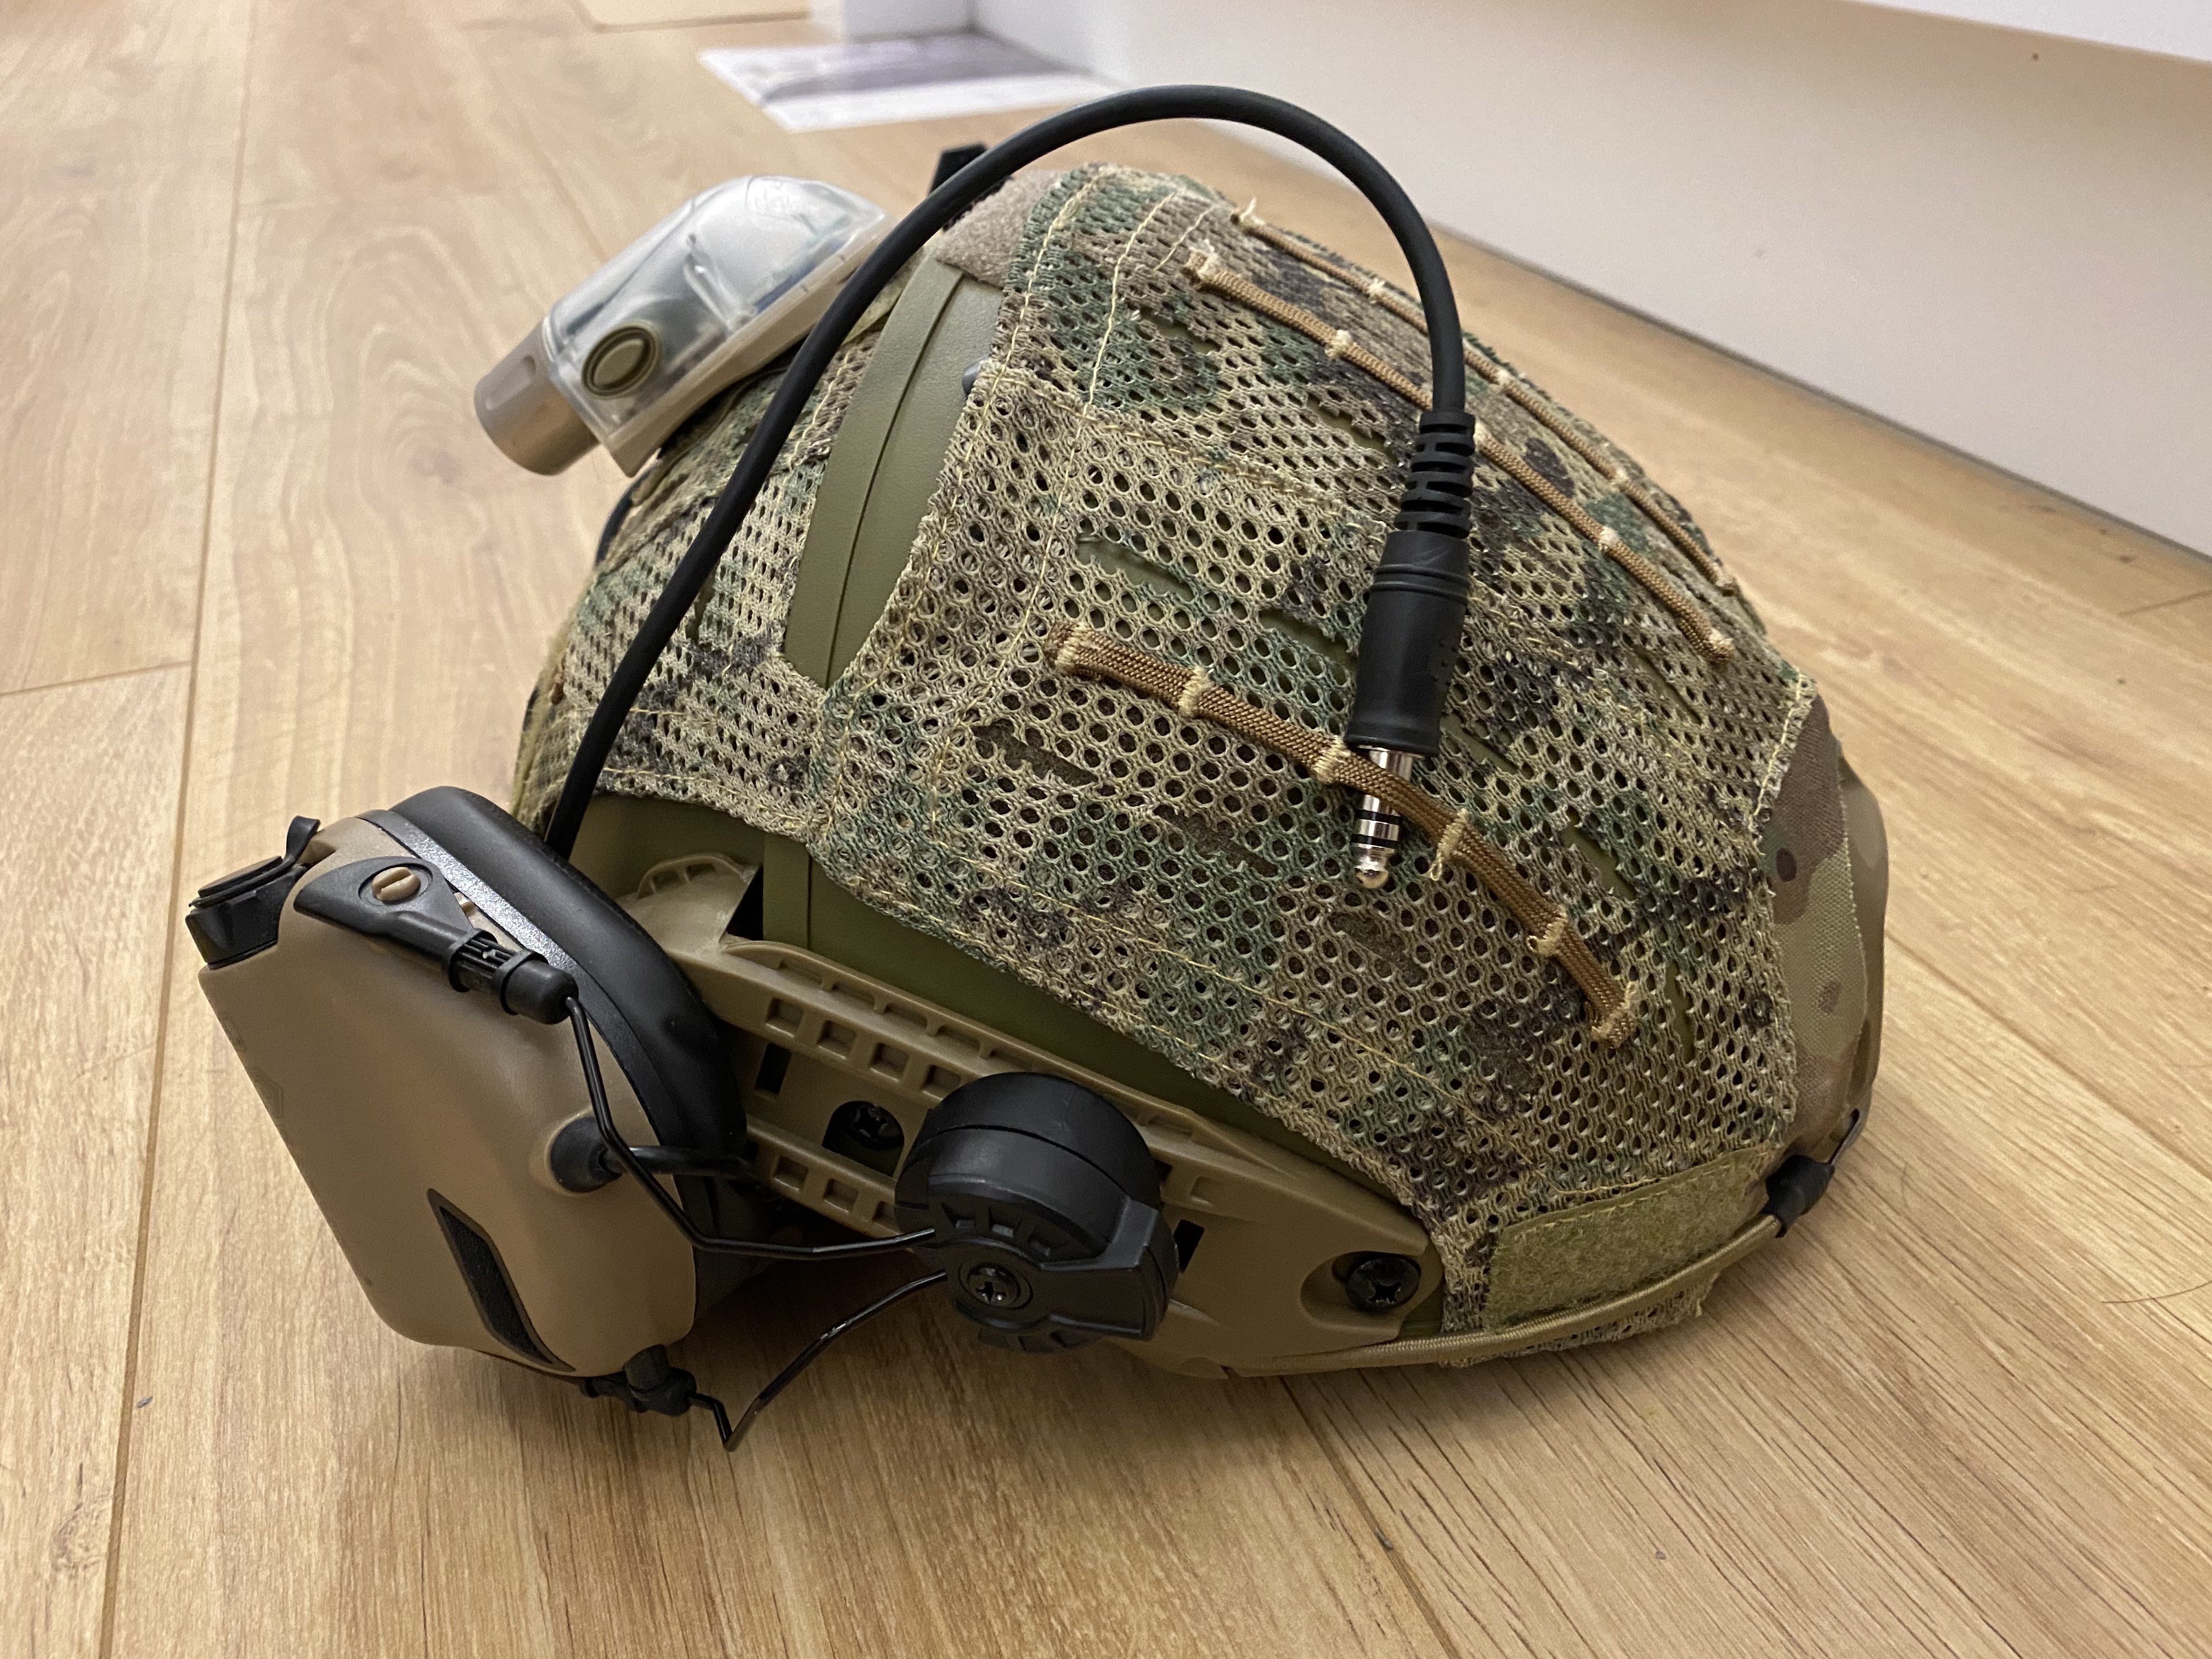
ODST2B9 sure is a big fan of Crye Precision! Though his helmet is a replica, this is a replica of the much-lauded Crye Airframe helmet, known for its dynamic futuristic look and advanced design. Unlike most combat helmets the Airframe is constructed of two parts which are bolted together with a slight gap in between to promote better airflow and greater comfort.
The Airframe also presents a very acute angle to any incoming fire which is part of the principle behind its design and is curved to more closely follow the contours of a human head. The Airframe is compatible with the vast majority of active hearing protection and comms headsets, and also boasts ARC accessory rails on either side, and an NVG mount plate on the front.
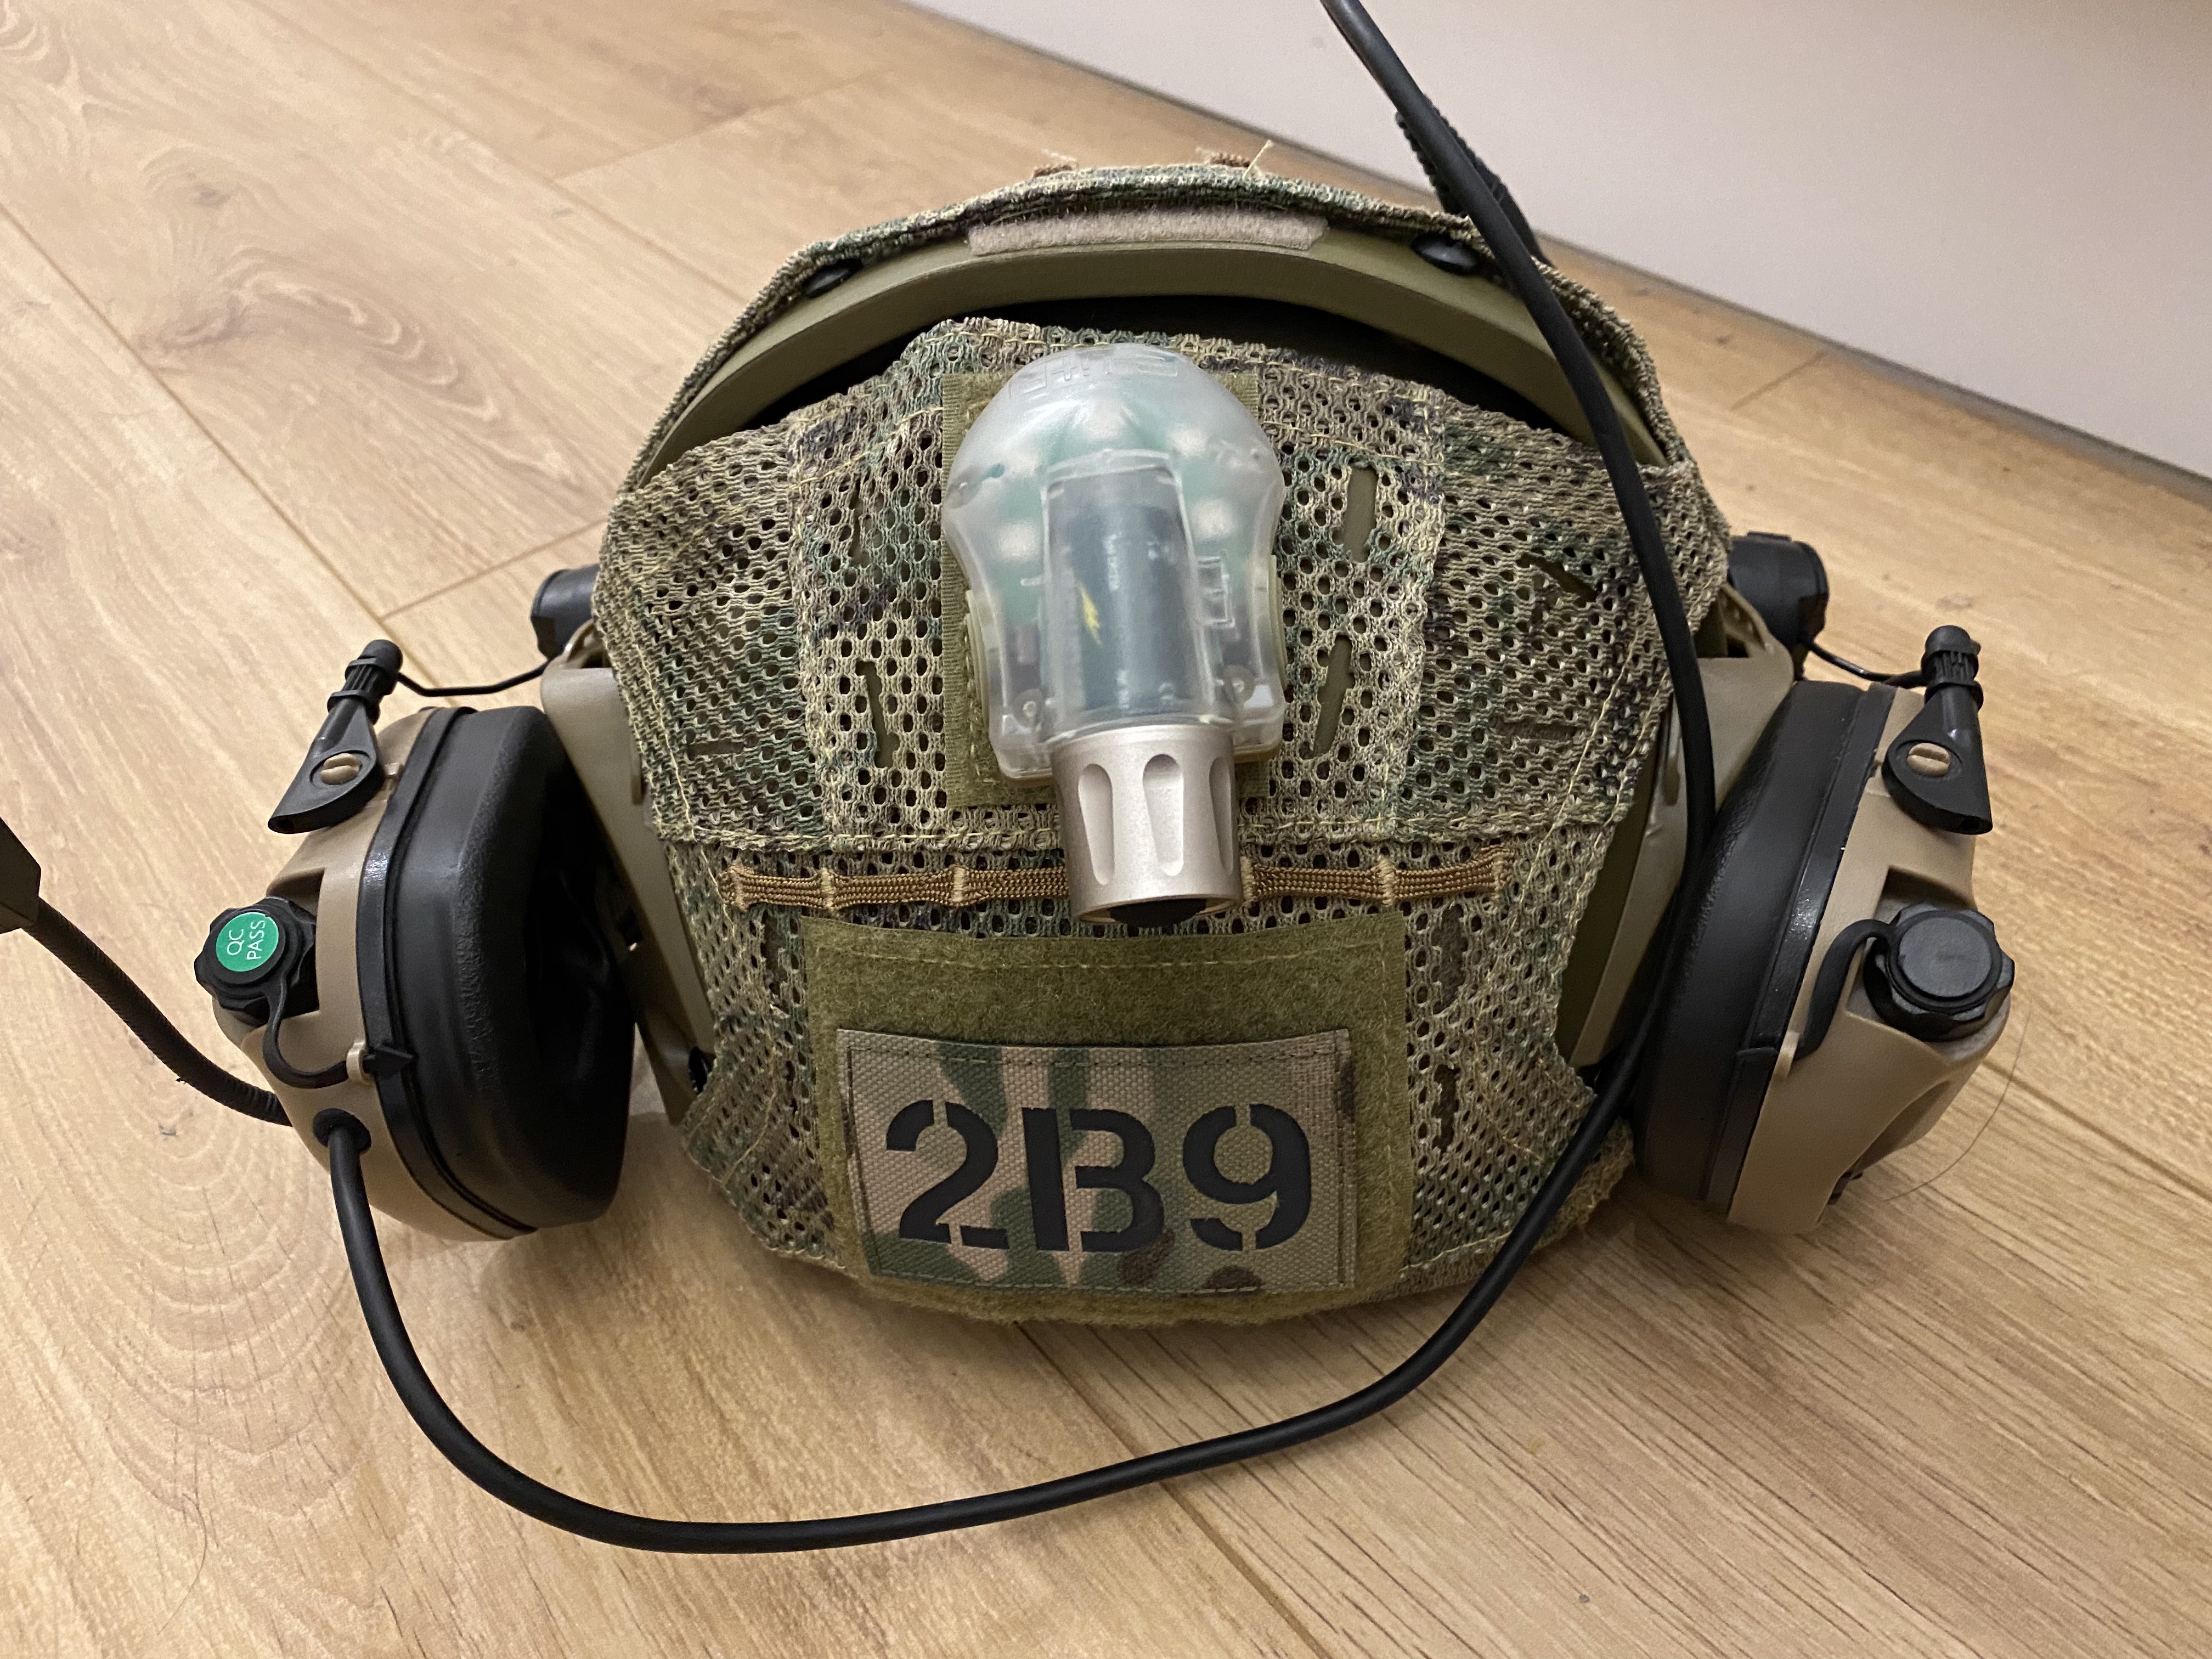
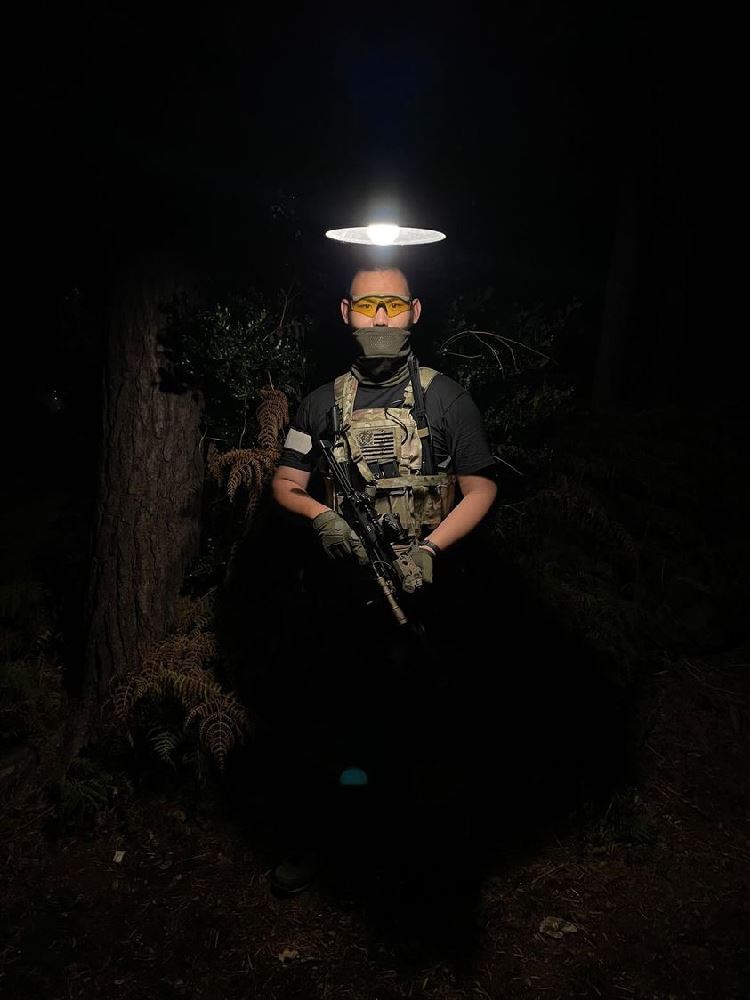
ODST2B9 runs his Airframe with an FMA Airframe helmet cover to aid in concealment with a Manta strobe on the rear for when he wants to be seen. The FMA Airframe cover is made from lightweight mesh fabric in Multicam pattern, and also includes loops for storing chemlights, adding natural foliage or routing wires for battery packs, action cameras and comms equipment.
The Manta strobe is a Special Forces helmet pre-requisite, and adding one of these to your lid can really give it a boost in realism. When asked why he went for the Airframe over the more common FAST helmets adorning most skirmishers' brows currently, ODST2B9 told us:
" I have owned various helmets in the past, including the FAST Helmet made by Emerson Gear, which is the replica of the Ops-Core. Personally, the Airframe fits better on my head and provides the level of comfort I am looking for compared to my Emerson FAST. For that DEVGRU setup, the Airframe is no stranger to the Teams. After doing research from reading articles and TV shows such as SEAL TEAM (shown on CBS), Bravo-4/Trent Sawyer can be seen wearing a Crye Precision Airframe Helmet from time to time. On my Helmet, I have added a mesh helmet cover in Multicam made by FMA, a Manta IR Strobe light for infrared designation, but also just looks cool, perhaps I will go with a Hel-Star 6 at some point. "
The Comms setup - Baofeng UV-5R with Earmor M32H and Earmor M52 PTT
For most Milsim skirmishes he attends, ODST2B9 works with his team, known as CC1 ("Charlie Charlie One"), and when working with a group on a large site being able to communicate effectively is one of the most important aspects of the game. With this in mind, ODST2B9 has equipped himself with a Baofeng UV-5R radio with an Earmor M32H Helmet mounted headset and an Earmor M52 PTT for the Kenwood/Baofeng plug type.
The M32H is the helmet-mounted variant of the Earmor M32; a communications headset with active hearing protection functionality. The "active hearing protection" function is extremely useful in a skirmish environment as it deadens loud and sudden sounds such as pyro and blank firing grenades, and enhances quieter sounds such as sneaky skirmishers around the next corner.
When asked about his Earmors, ODST2B9 said " For my radio headset, I have adopted the Earmor M32H which comes pre-fitted with the Arc Rail adapters for mounting to the brain-bucket. The Earmor is a low costing radio headset compared to its real steel counterpart, the Peltor Comtac 3M which stands around the £400 mark. ".
To use the M32 for communication a PTT (push to talk) is required, and the Earmor headsets are only compatible with Earmor PTTs, which isn't a bad thing. You may not have a lot of options as far as the looks of the PTT is concerned, but the Earmor examples work perfectly, offer a variety of connector types and are very affordable, even when compared with other replicas.
The PTT allows the user to control the transmit and receive functions of the radio remotely, and ODST2B9 usually positions his PTT on the right side of his plate carrier, just above his magazine pouches for easy access in any shooting position while minimising the chances of accidentally pressing the transmit button and effectively jamming his team's communications.
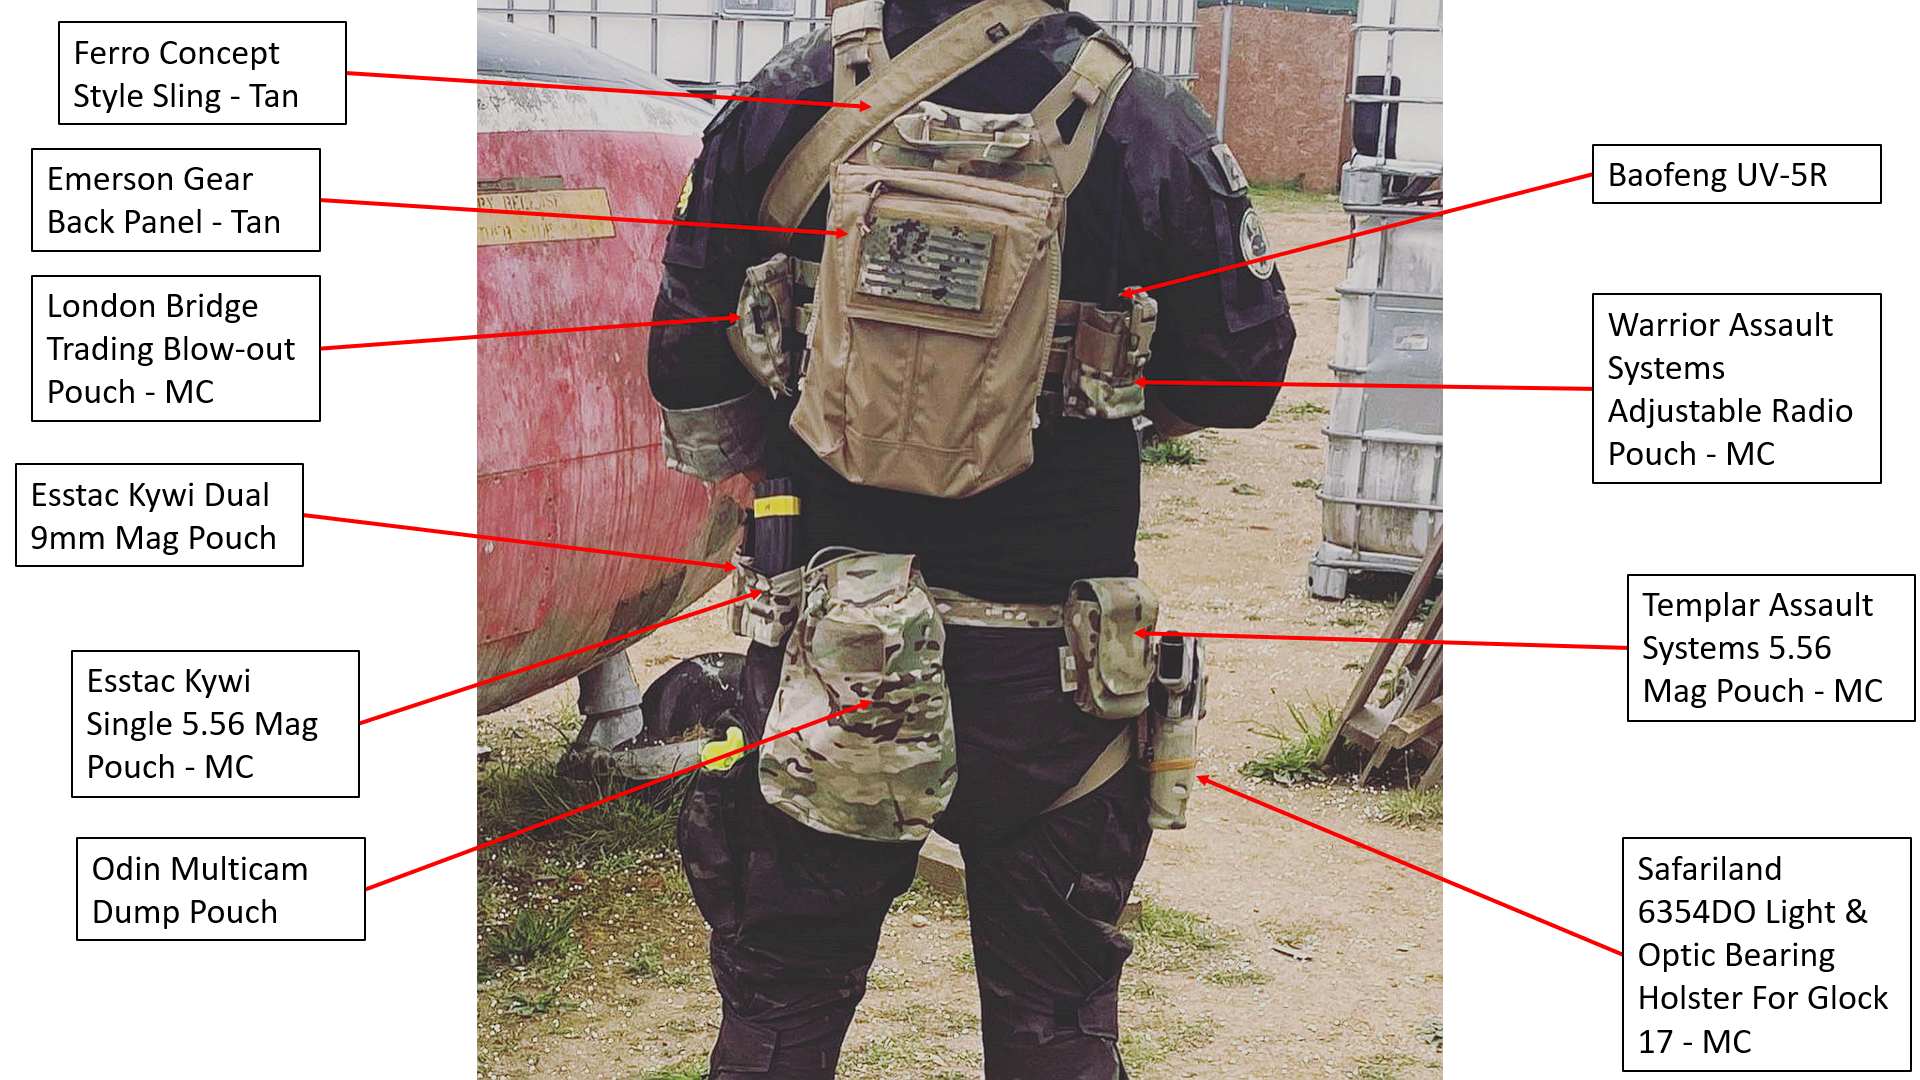
The Belt Rig - Multicam Shooters Belt with Odin Tactical Dump Pouch and Kydex Customs Light Bearing Holster
As his "First Line" of combat gear, ODST2B9 runs a Multicam Shooters Belt with a selection of real steel pouches for his pistol magazines, a couple of spare rifle magazines, a dump pouch for spent mags and a holster for his sidearm du jour.
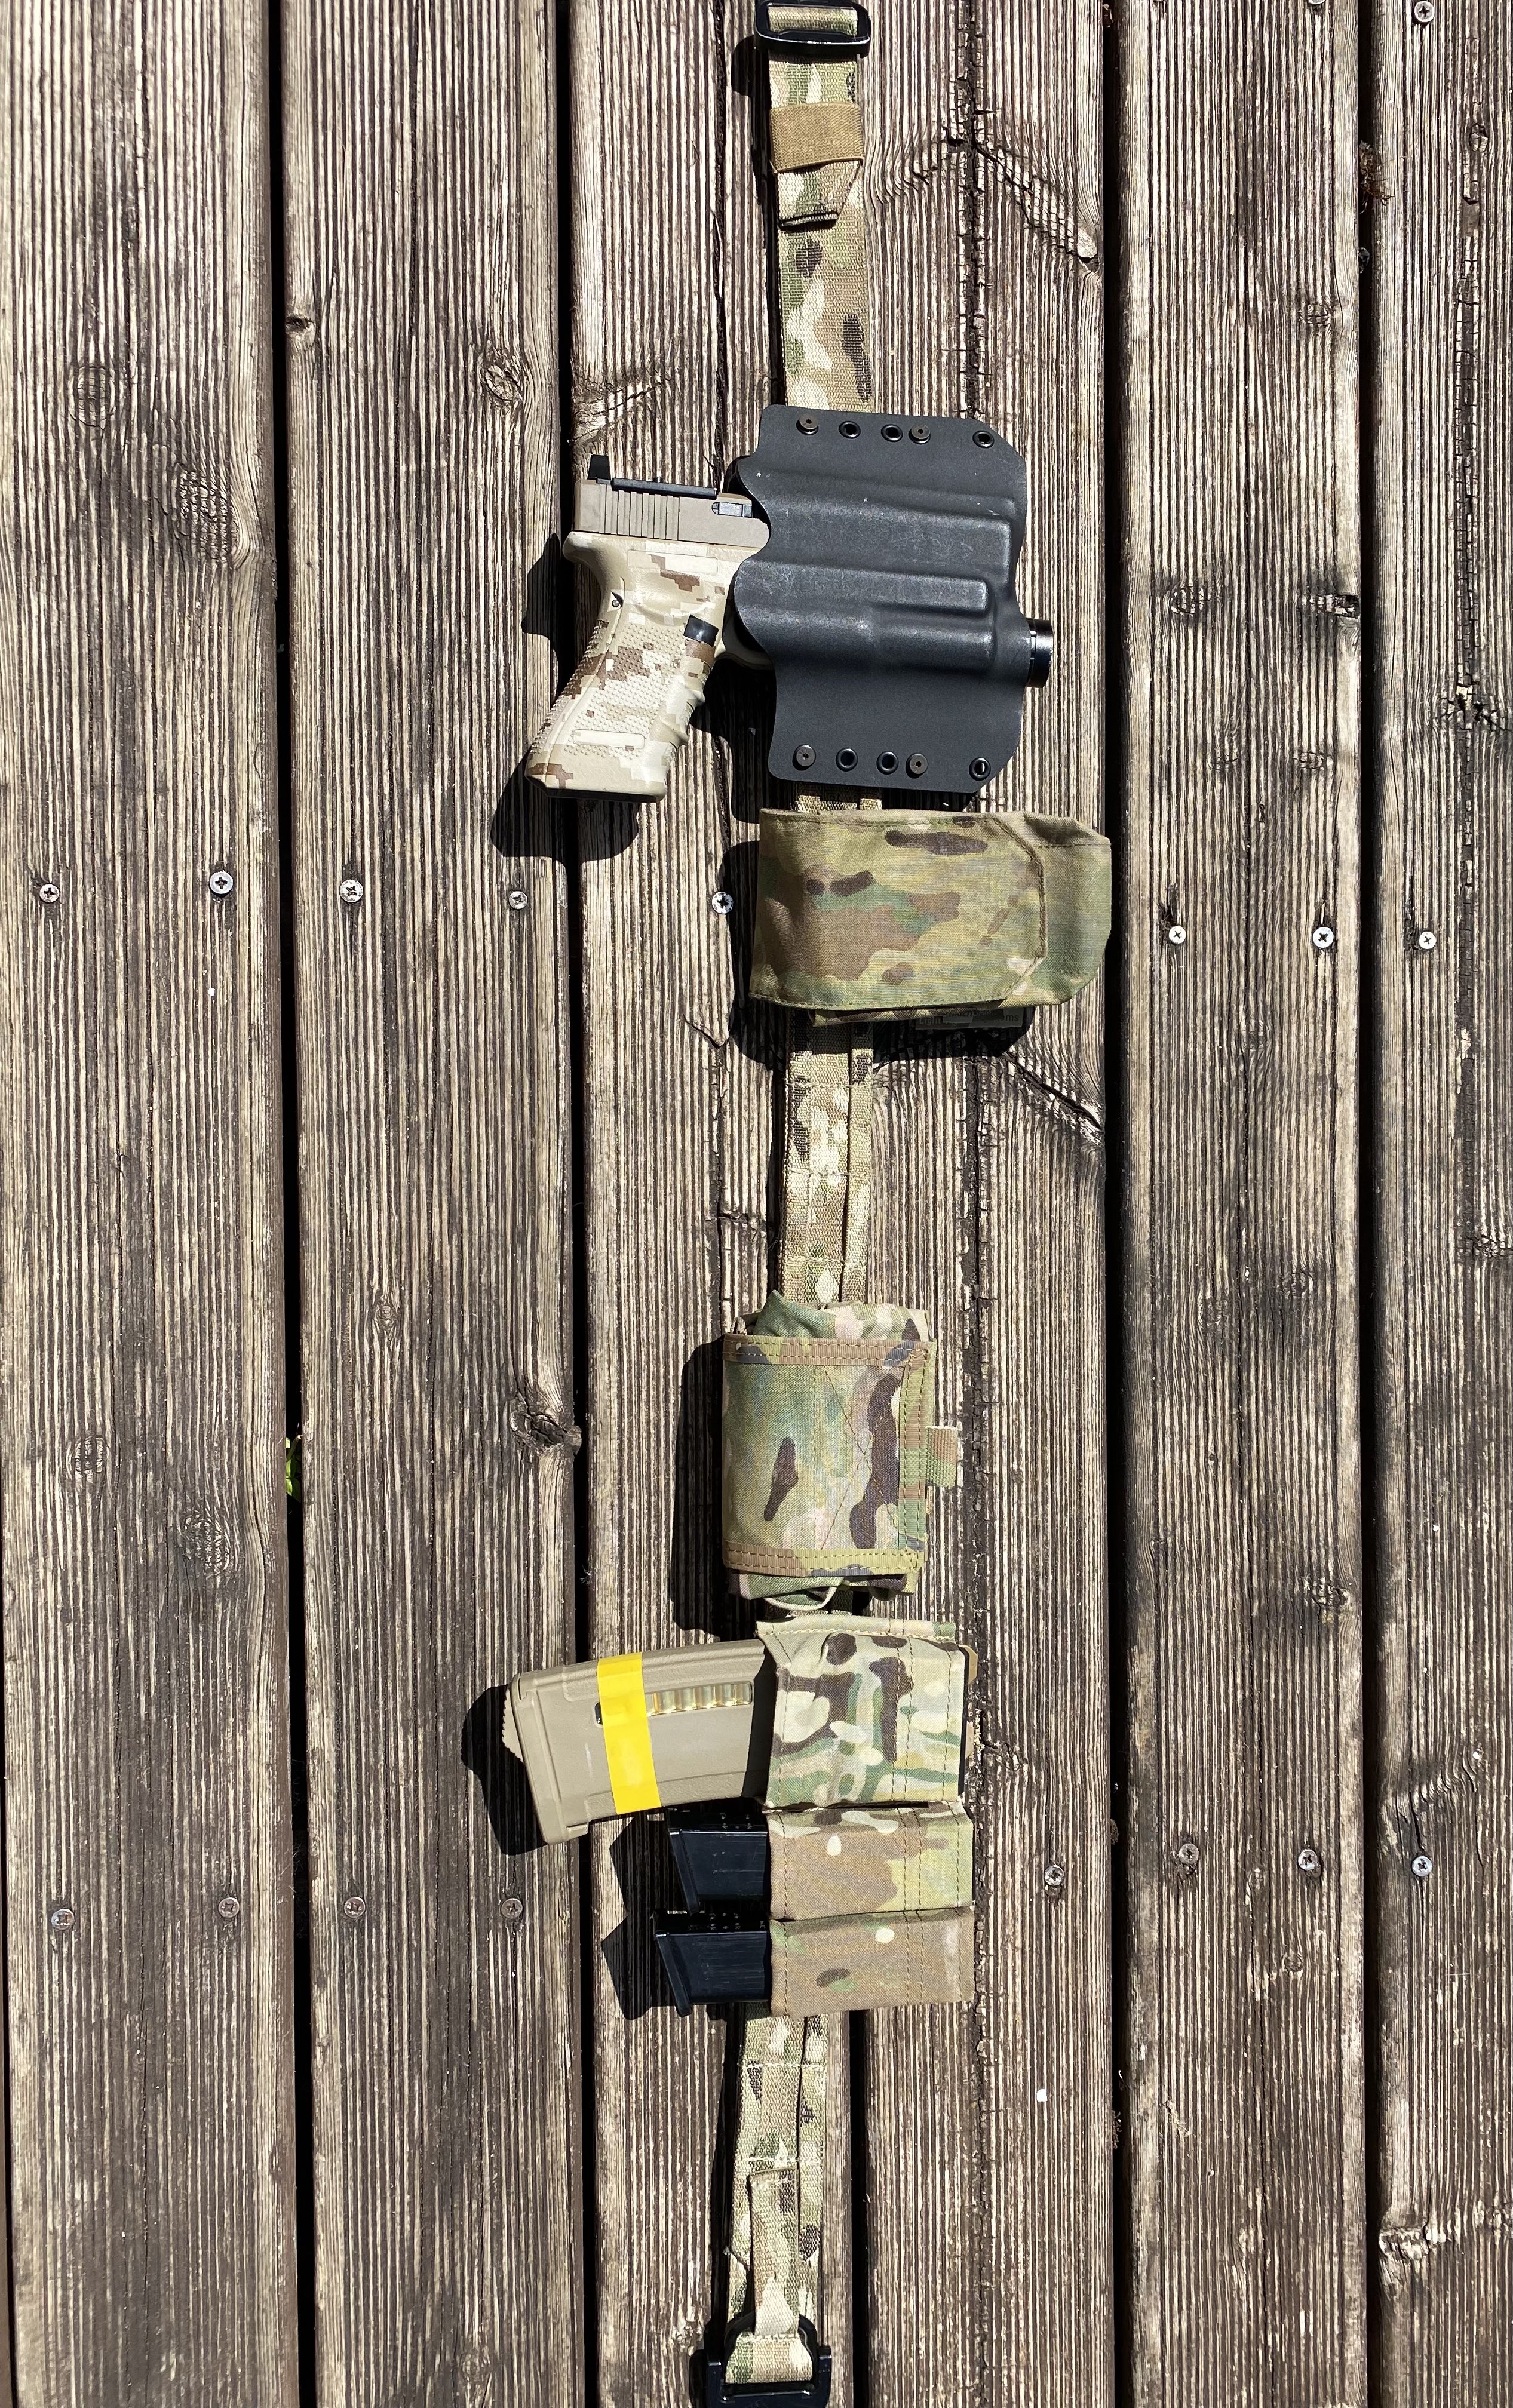
ODST2B9 is lucky enough to own two different high end holsters, a Kydex Customs Light Bearing Holster for Glock 17/18 and a Safariland 6354DO Light and Optic Bearing Holster for Glock 17. Light bearing holsters are hard to find for Airsoft EU pistols, and a tactical flashlight is rapidly becoming the norm for Airsoft sidearms, so ODST2B9 went the whole hog and wisely invested in some fantastic holsters and avoided the hassle of finding a replica holster to provide a good fit and solid retention with his sidearm setups.
Not being one for dual wielding, ODST2B9 tends to choose the holster which suits his environment the best, opting for the Kydex Customs holster for when he wants a "high ride" draw position and the Safariland for when a lower draw position is desirable, such as when he is crawling around on the ground with his Novristch SSG96. His Safariland holster has also been treated to a Multicam fabric wrap, tying it together with his Multicam pouches, belt, JPC and helmet cover.
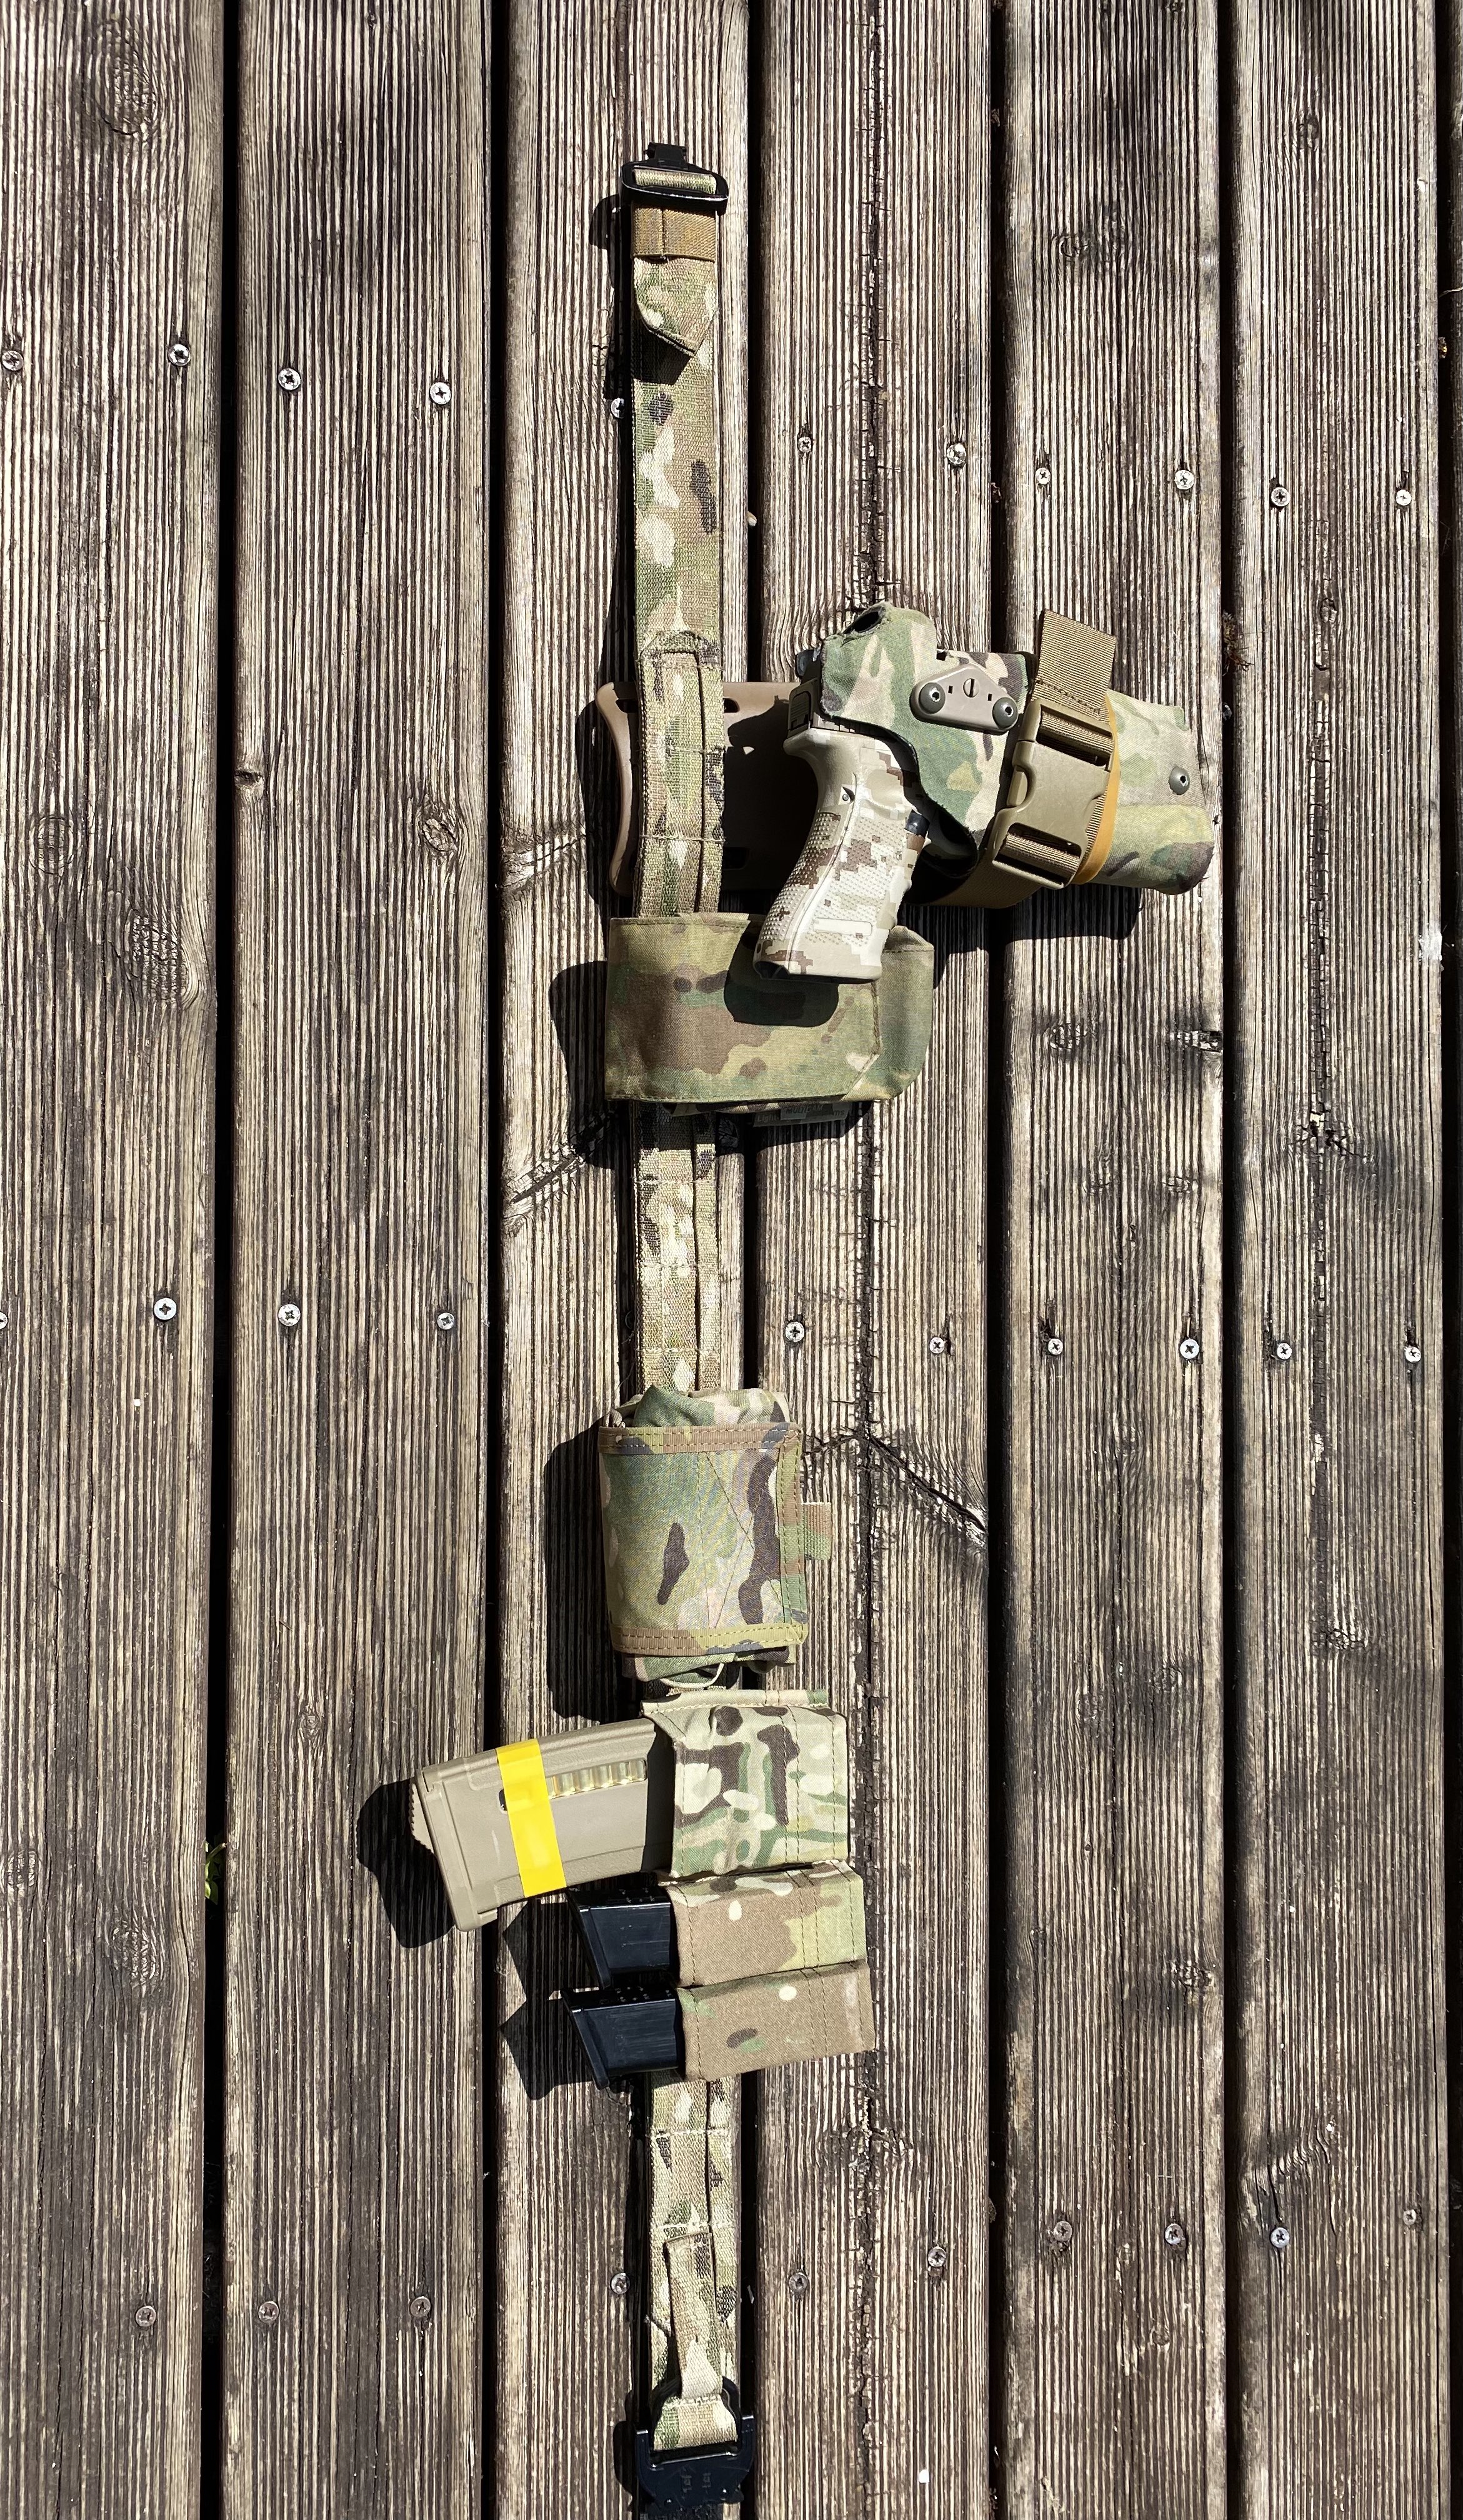
Being right-handed, ODST2B9 runs his holster on the right side of his belt and magazine pouches on the left. His pistol magazine pouches come first followed by a spare mag pouch for his primary.
These magazine pouches are Esstac Kywi pouches and are open-topped to allow for fast reloads under pressure. He runs a dual 9mm mag pouch which fit his Raven and WE EU series magazines securely, with a 5.56 single mag pouch just behind.
Having a spare primary mag on your belt can be very useful in the event that you need to pull off a reload double time, as it is often quicker to grab a mag from your belt when in a standing position than to go for one in your rig. This leads us on to the Odin Tactical Dump Pouch, which ODST2B9 positions just to the rear of his 5.56 single mag pouch and sits on the left side of his lower back.
This means when it's fast reloading time ODST2B9 can drop his spent magazine into the Odin dump pouch, grab his spare magazine and load it in one fluid motion. This is a fundamental principle when setting up your kit, as it all needs to be laid out in an efficient way which works with your setup and body mechanics.
When the Odin dump pouch is not in use it folds up into a neat little package which doesn't obstruct movement and can be opened up in seconds, and it takes up a minimal amount of horizontal space on his belt, leaving plenty of room for other pouches.
The Uniform - Emerson Gear G3 Combat Uniform Multicam/Multicam Black
ODST2B9 tends to keep his core gear consistent and change up the camouflage pattern he wears depending on the skirmish site he is attending and what his teammates are wearing. While his rig, belt and helmet are always in MC, they are combined with either Multicam, Multicam Black or AOR1 combats.
For urban and CQB skirmishes Multicam Black is ODST2B9's pattern of choice, as it blends in more readily in the non-natural urban backgrounds, and works exceptionally in low light conditions.
Outdoors, ODST2B9 rocks Multicam for its superb camouflaging qualities in a wide range of environments, and he finds it works well for both woodland and urban skirmishing, not to mention it suits the modern SEAL look perfectly.

ODST2B9's MC and MC black are from Emerson Gear and are a generation 3 style of combat uniform, a close copy of the real steel Crye Precision. ODST2B9 tells us he prefers gen.2 style combats but went with gen 3 as they are the most fitting for his loadout.
Gen 3 combat trousers include pockets for Crye's knee pad inserts, meaning your knees can stay protected without the discomfort usually associated with wearing knee pads. Many of us use gen.3 combats from various brands, and truth be told, we don't know how we managed before gen 3s came out!
Not content to dress in replica kit, ODST2B9 currently has real Crye Gen.4 combats winging their way to him. His plan is to use these new rather expensive combats with his SEAL kit, and a future UKSF kit he has planned. Stay tuned for an upcoming blog on that and expect the bar to be raised further still!
What do you think of ODST2B9's loadout? We think it's pretty darned swanky, probably amongst the best Navy SEAL loadouts out there gracing the skirmish sites of the UK.
There will be more to come from ODST2B9 in the form of future loadout blogs for his upcoming projects, and a more detailed look at his Tokyo Marui MK18 NGRS and MP7 GBB primary weapons.
Until then, if you ever want to ask ODST2B9 for pointers on your kit, or advice on setting up your own SEAL loadout, catch him on Toky Woky using the "Ask Players a Question" button on any product page on our website!